Mechanical Interface Design: Prevent Overconstraints, Reduce Tolerance Stack-Up
The foundation of RD8 Software, Robust Design, and tolerance stack-up analysis is the principles of interface- and system-design of mechanical systems.
This page will elaborate on the principles.
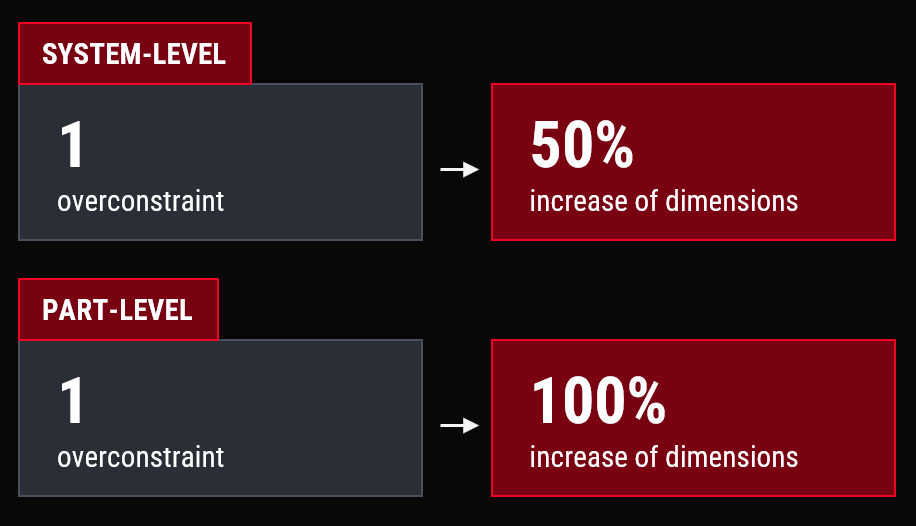
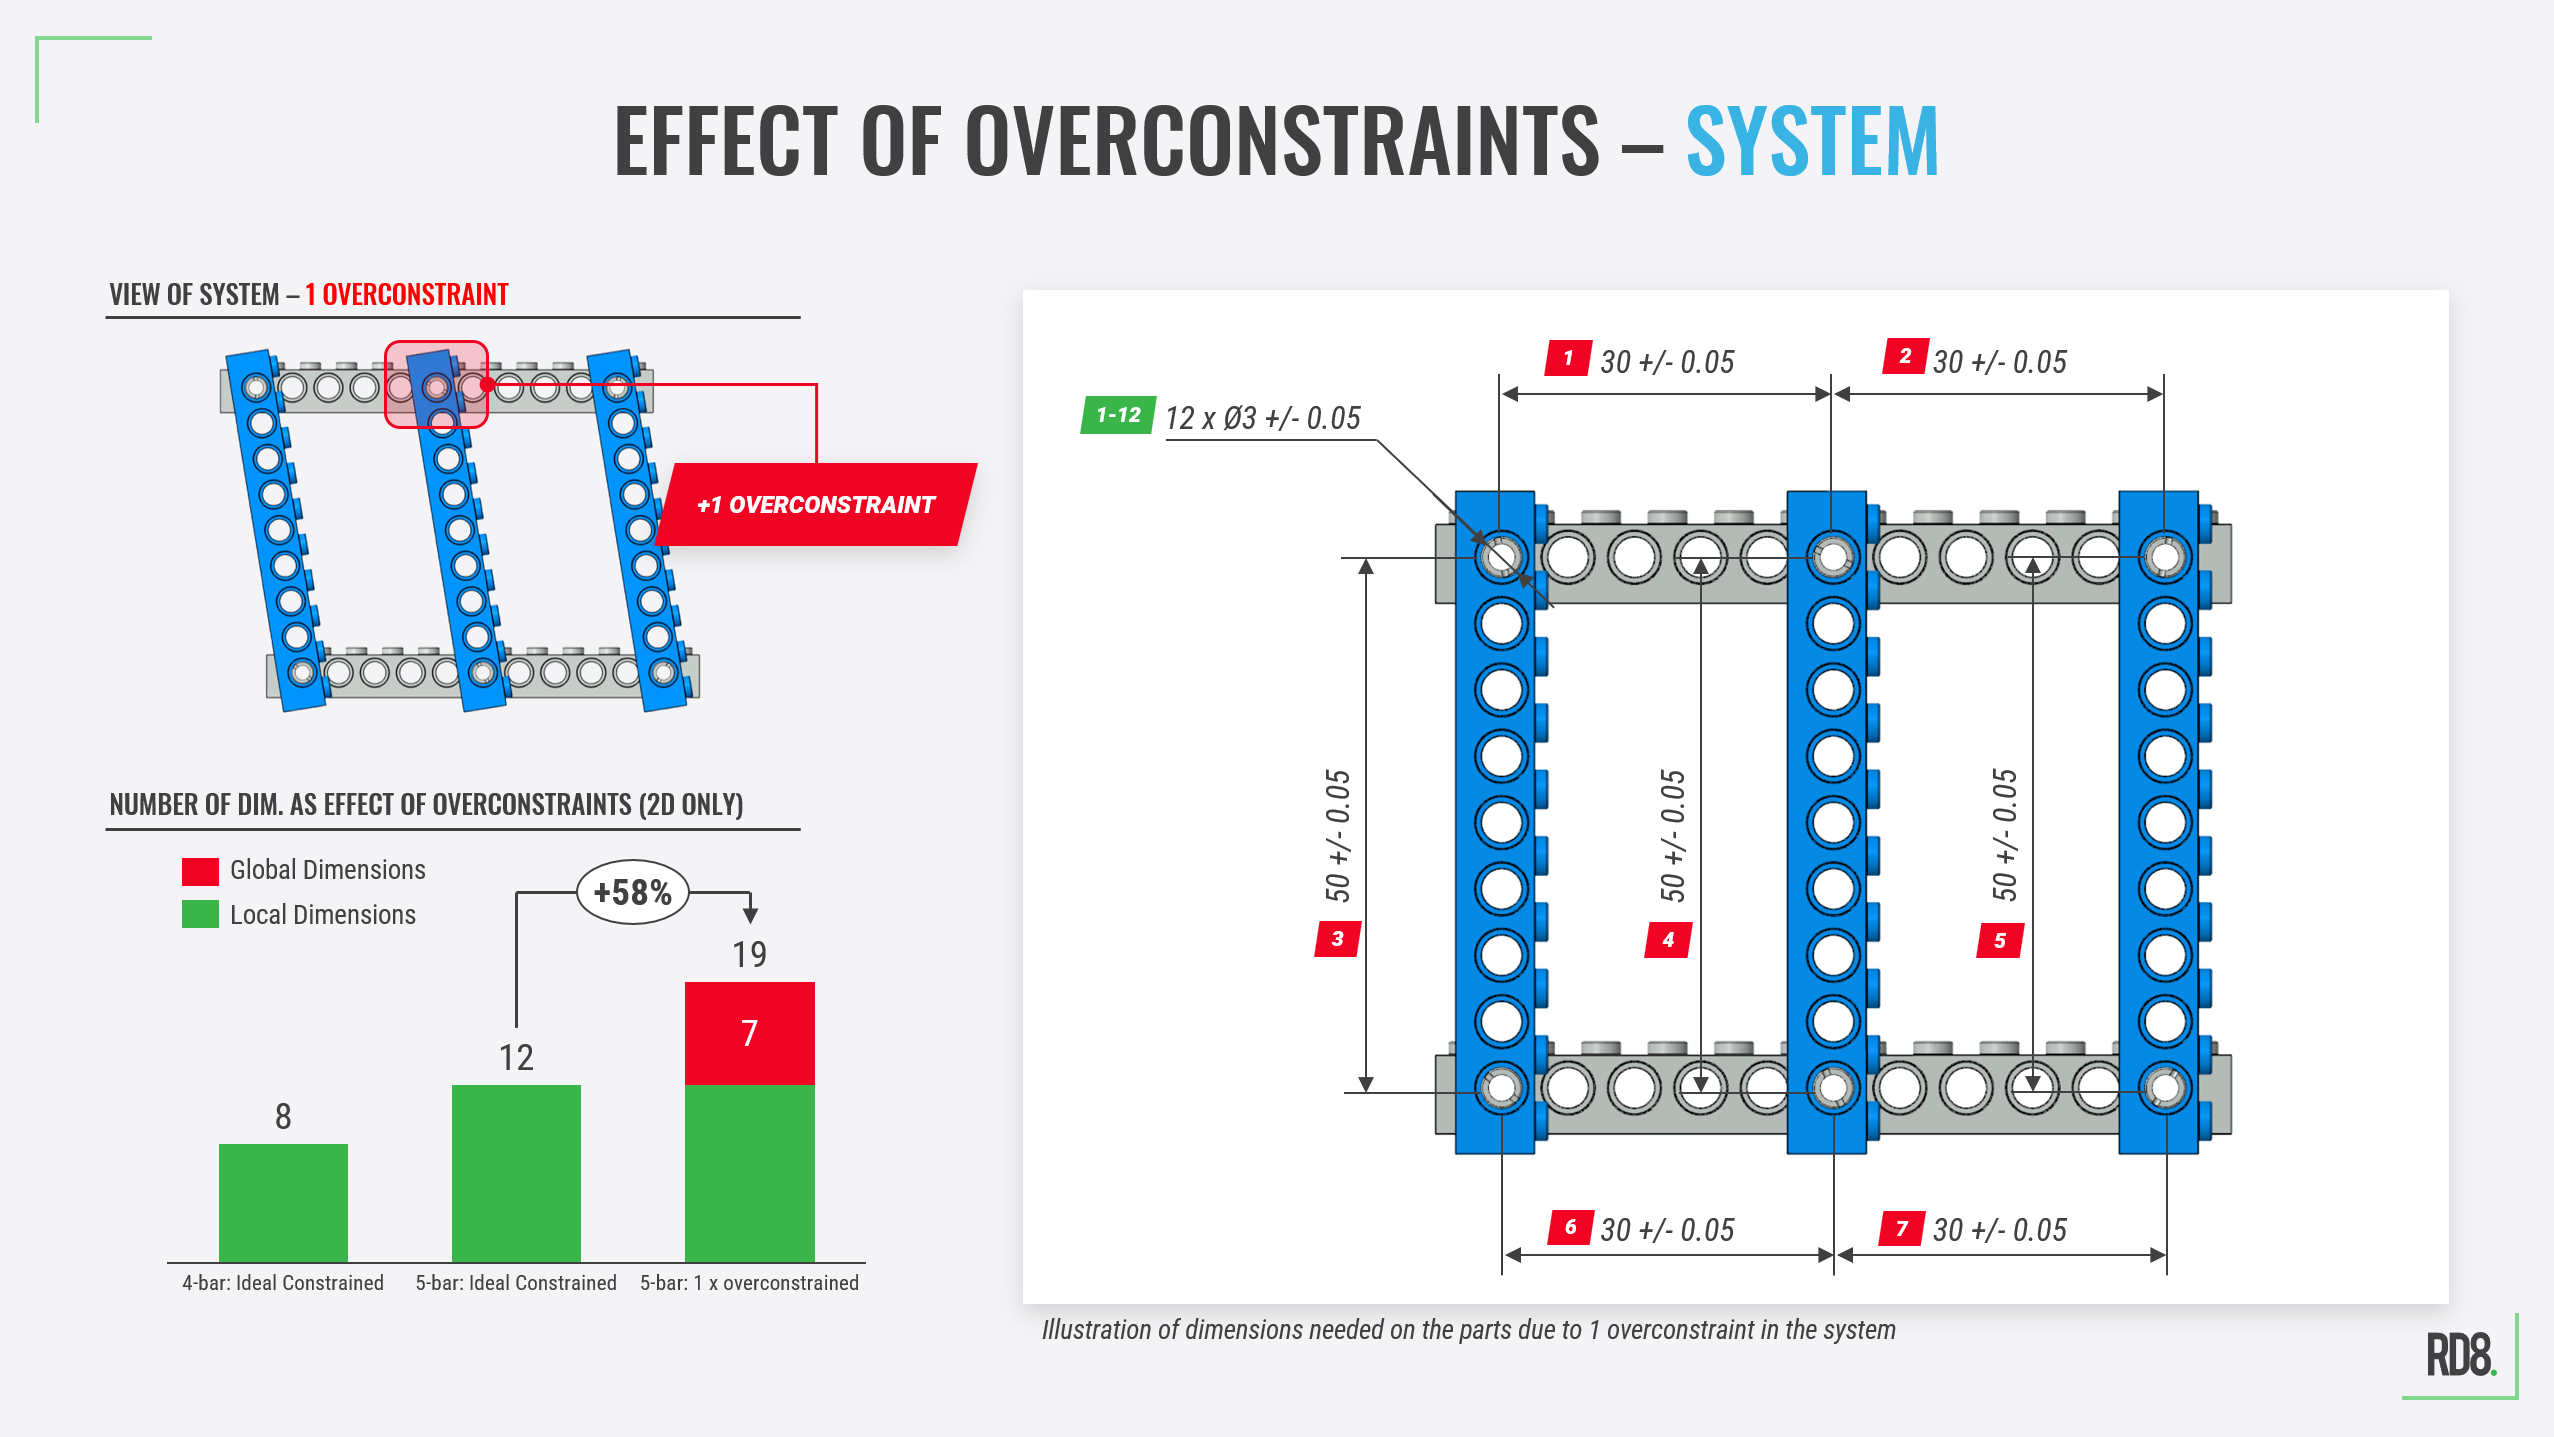
One overconstraint in a system may drive 50% additional dimensions in a system.
One overconstraint in a part-part interface may drive +100% additional dimensions.
Trusted by engineering teams building high‑performance mechanical products



INTERFACE DESIGN: System level
One of the arguments for avoiding overconstraints are that they add unwanted complexity - often invisible to engineering teams. Typically just a single overconstraint on system level can add more than 50% dimensions to a drawing.
We often see more than 10 overconstraints in moving assemblies with more than 15 moving bodies.
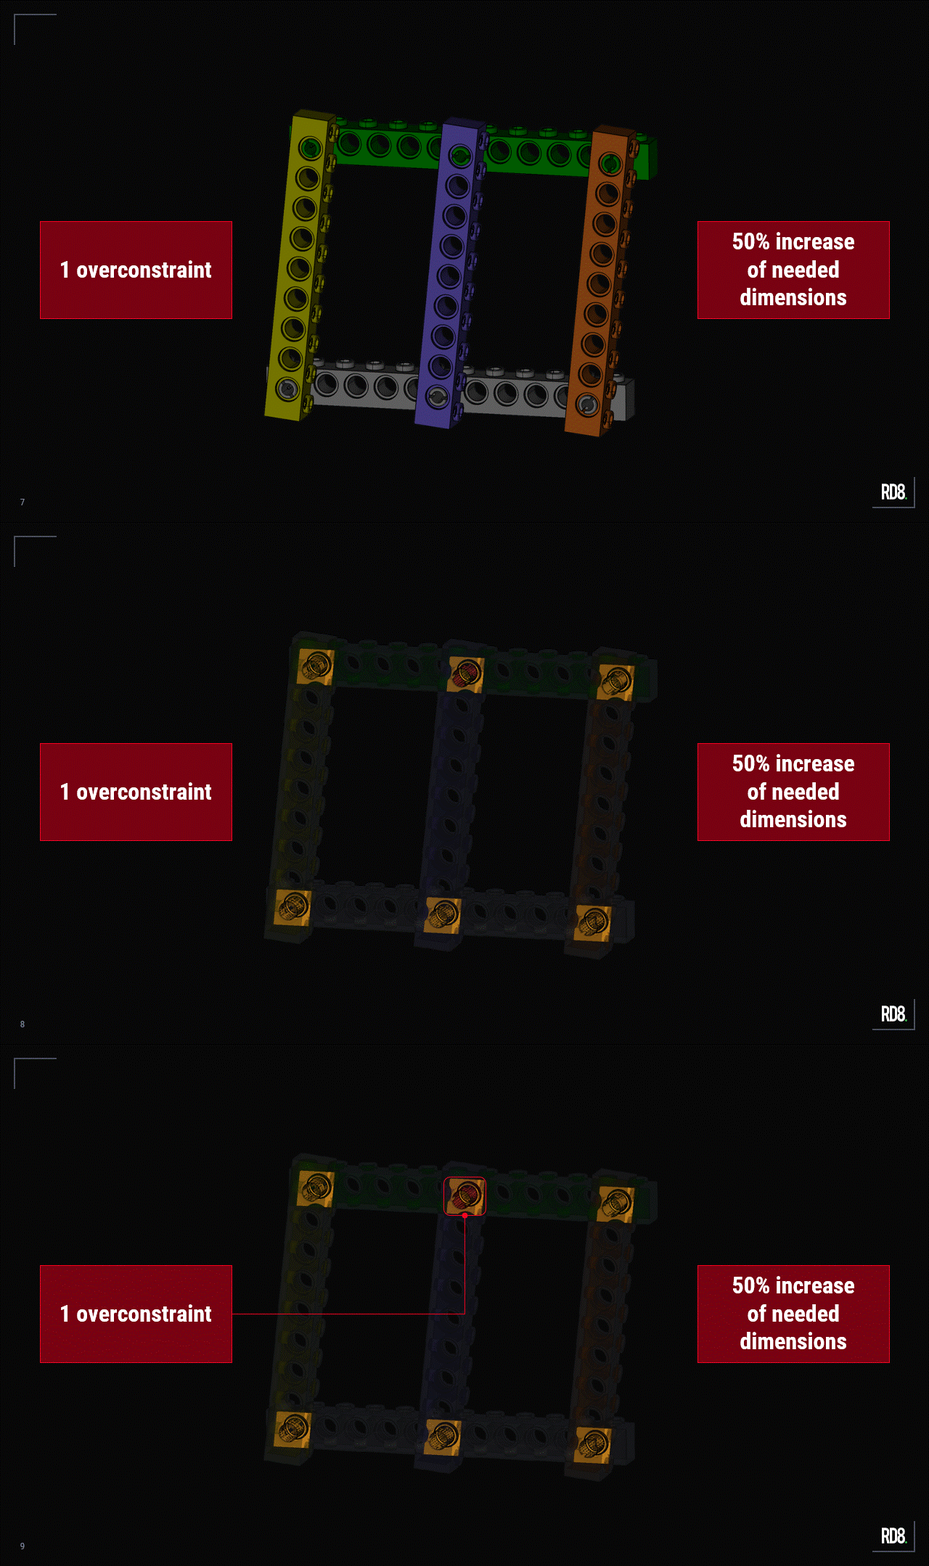
RD8 Software can automatically X-ray CAD files and identify overconstraints on system level (the picture above shows the 'X-ray' results from RD8 Software - where the overconstrained pin-interface is highlighted with red color to indicate the system level overconstraint.
The video below explains how a single extra constraint in a simple assembly drives more than 50% additional dimensional requirements.
The principles are based on theory from moving mechanics - the mobility equation; also known as the Kutzbach equation, the Kutzbach criterion, or the Chebychev–Grübler–Kutzbach criterion.
The Breakdown
The Fourbar Mechanism (in 2D)
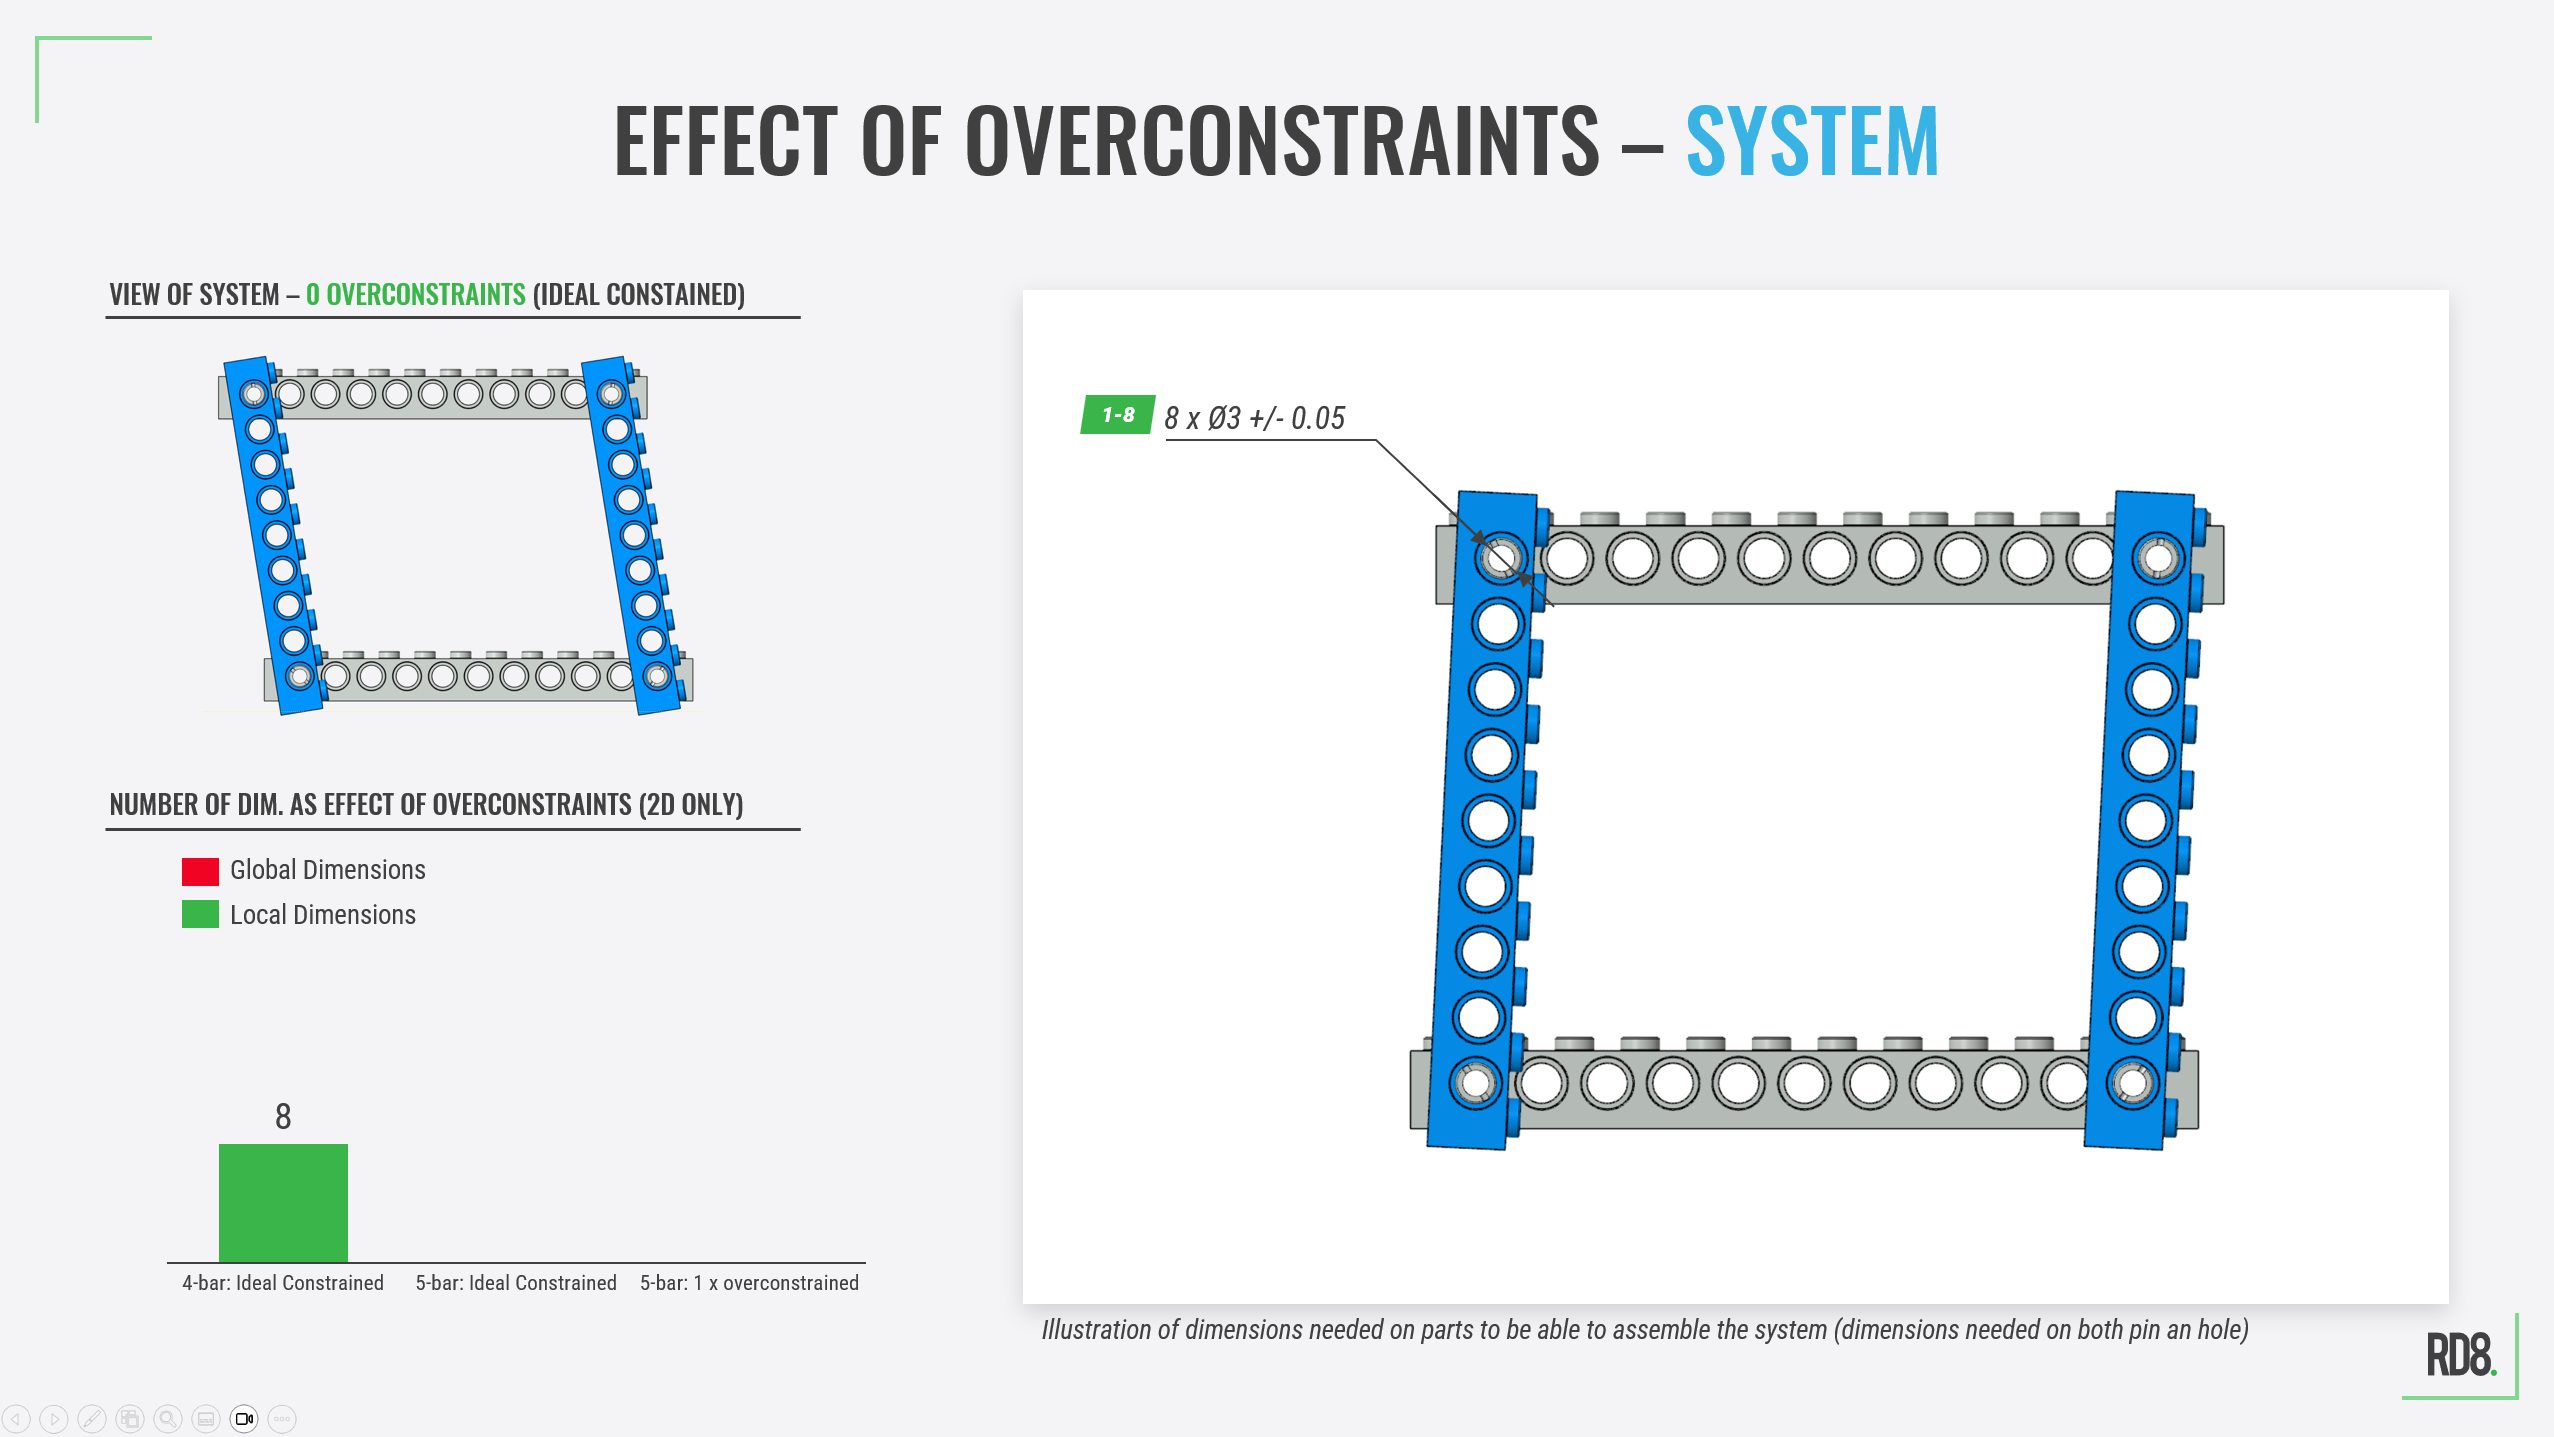
In 2D - the mechanism is ideally constrained. Between the moving bodies - the four pin diameters and four matching holes need to be specified/dimensioned.
8 dimensions in total:
Adding a Fifth Bar
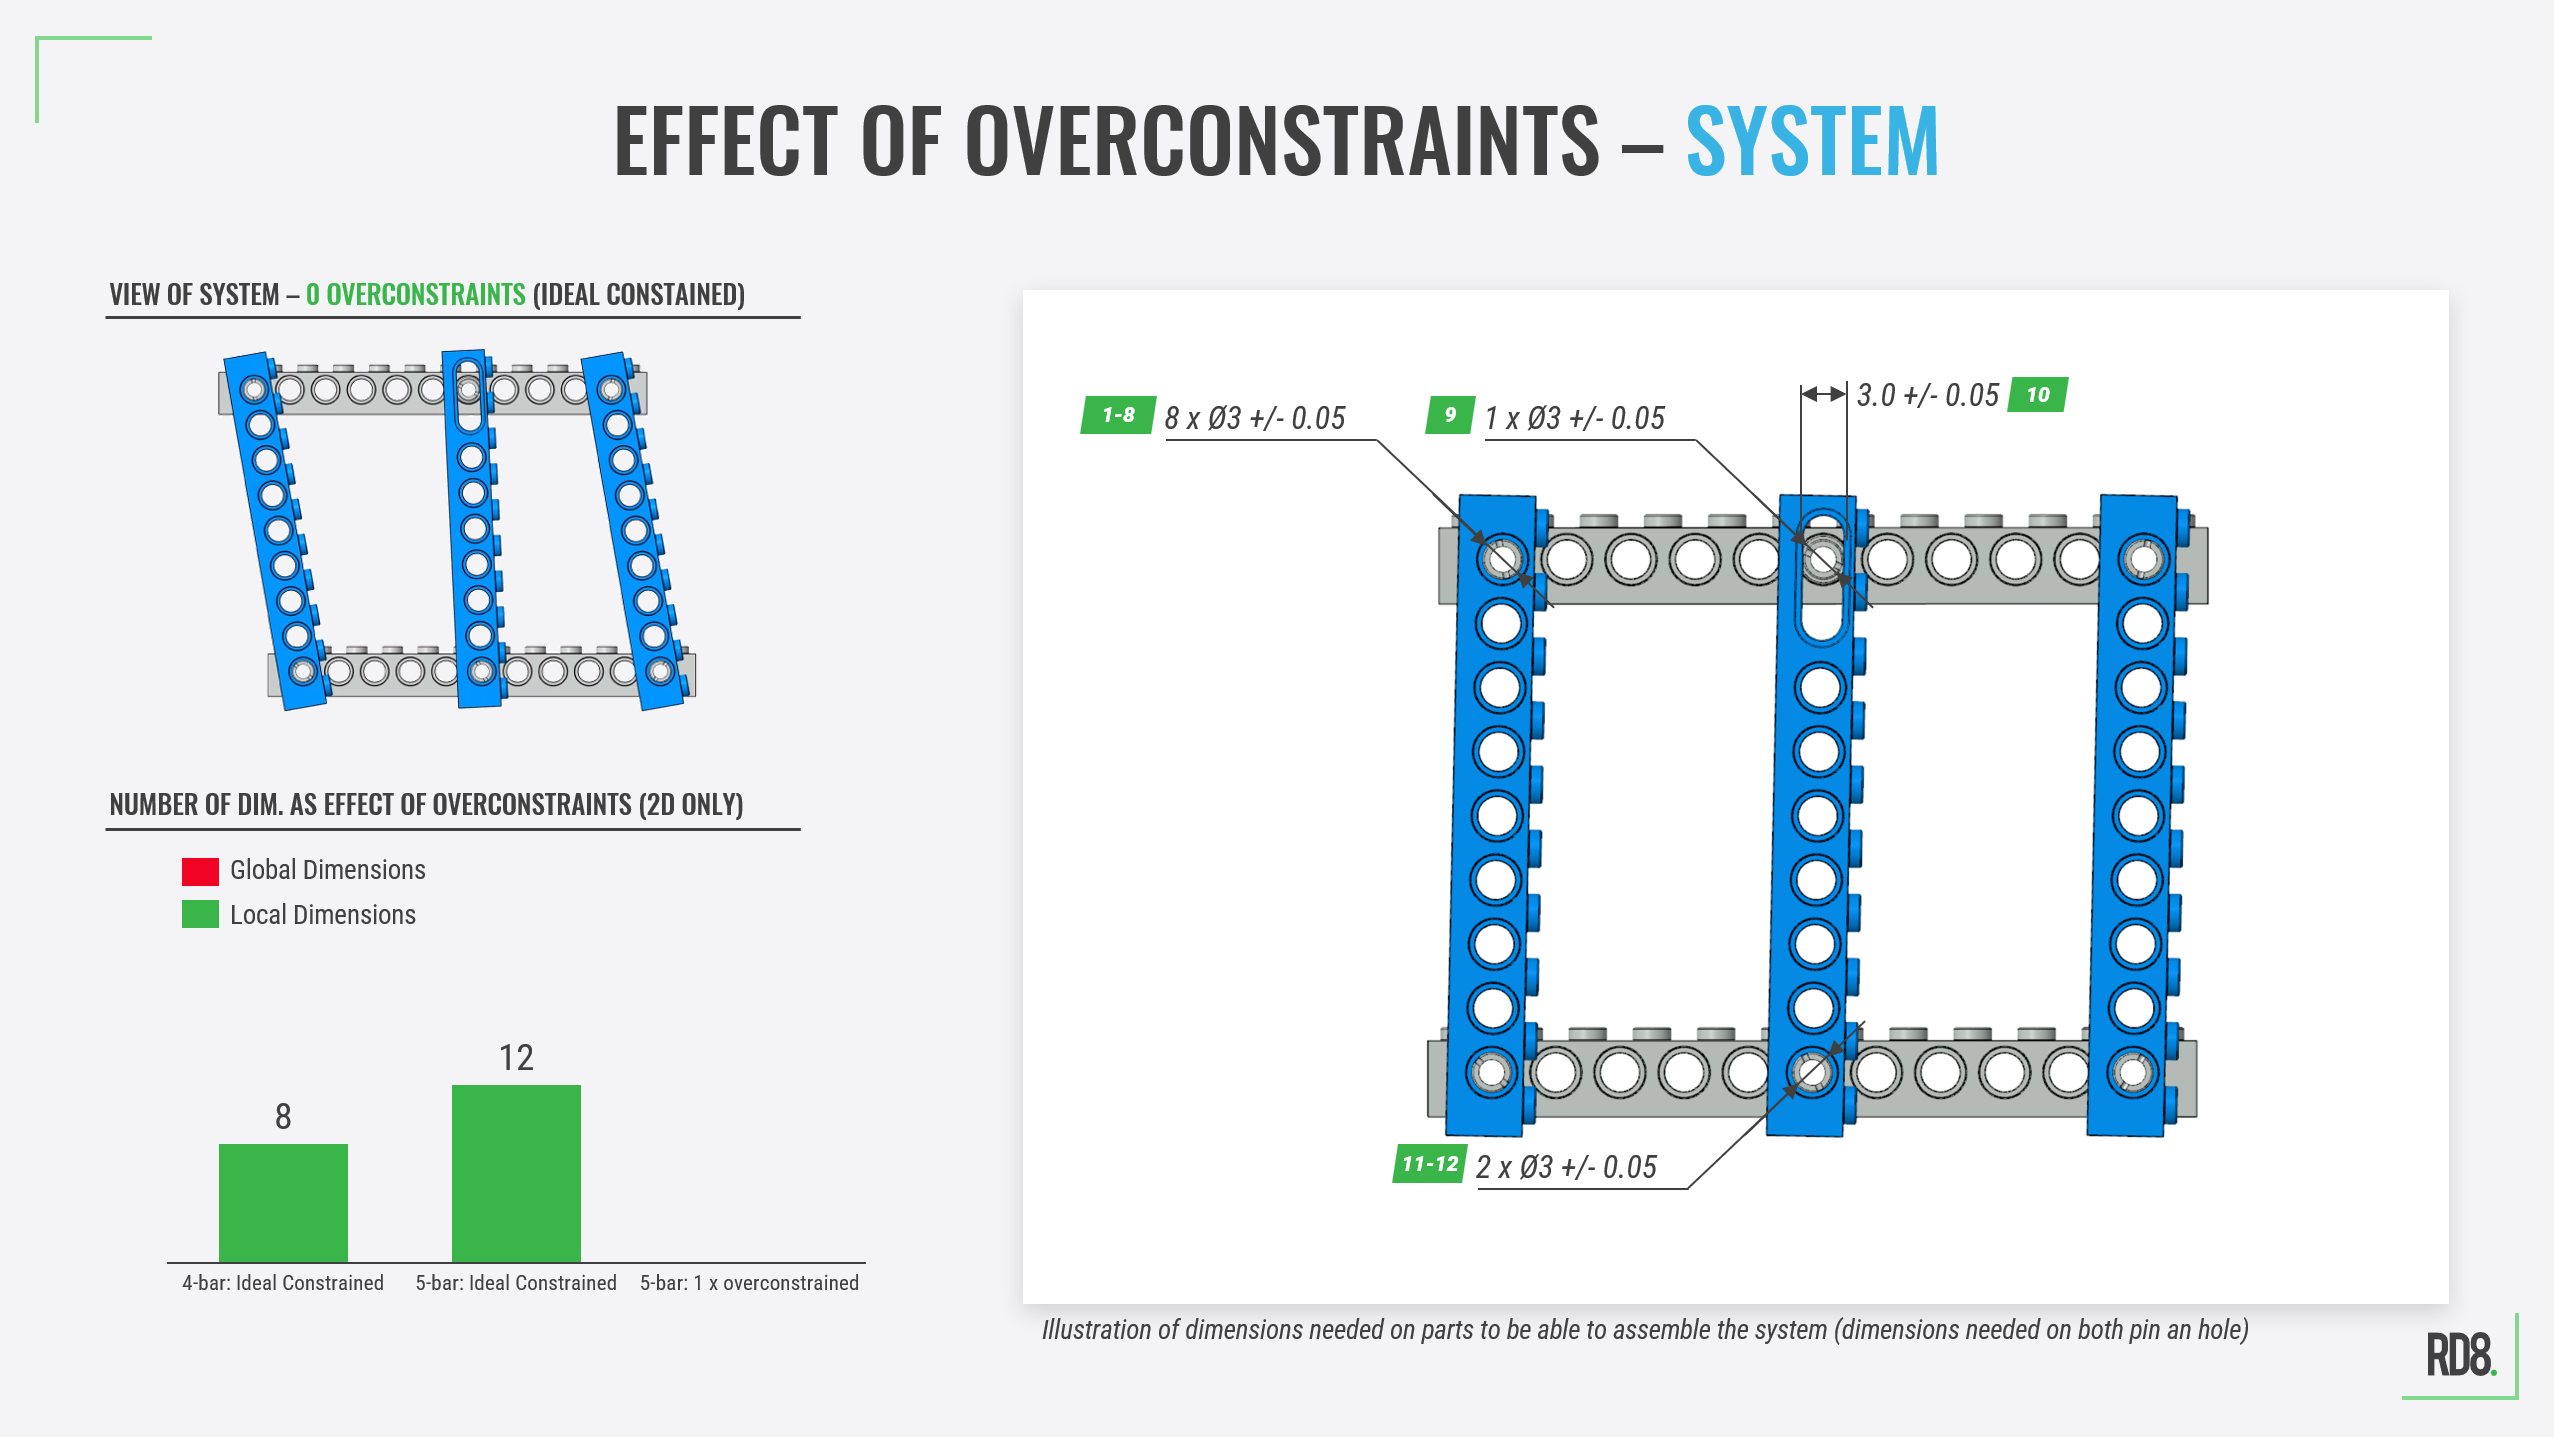
That adds additional requirements for two pin diameters, a hole and the width of the oblong slot:
The Effect of One System Overconstraint is +50% Complexity
If there is no oblong hole present; the systems becomes overconstrained in a 2D analysis (RD8 Software can automatically detect this for you).
The effect is that you need to keep all 'global dimensions' in control. You need to specificy and keep all dimensions in control between holes and pins to make the system run smoothly - stress free - without any binding.
In this case - 1 overconstraint - results in 7 additional dimensions (+58%).
Synthesis: Creation of Design intent and new concepts by robust interface design
In the adjacent video - two fancy slider designs are shown. They are both Robust and can handle variation.
They are both designed with the equal clearances and produced with same accuracy. The geometry, number of parts and constraint-sets are different.
The motivation and benefit in this case - as in all other cases - is that a lot of tolerance requirements can be made obsolote with Robust Designs.
In traditional slider design - there is typically a need for precise alignment between the two rails.
In these designs there are NO REQUIREMENTS to:
- Distance between the rails
- Parallalism between the rails
It would only be the local fits between rails and hole diamteres of the bushes that would be the critical factor for success here. Something that is much easier to control - than critical dimensions accross an assembly.
The Eccentric Design
The eccentric design features an eccentric mechanism that absorbs the variaion.
The "Double Slider" Design
This design features two sliders that is connected by a connection rod. The connection rod has some unique details hidden in the interfaces to the main-sliders. One side acts as a pin-joint the other as a cardan-joint.
The concepts are not optimized for manufacturing, assembly or loads cases.
The Takeaway
Using Robust Design Principles - hereby Interface Design Principles - you can synthesize new innovative concepts. You can explore benefits of adding an extra part or how to ideally configure the degrees of freedom in each interface in the system to achieve robustness.
What's next?
Ensure robustness and handle all interfaces in your next project.
Start with defining the ideal concept - then track and mature the CAD model in the RD8.Software application.
RD8.Software is integrated with the a CAD file, tolerance lookups, can do Monte Carlo simulations, check your constraint assumptions and much more.
Interface Design: Part-part LEVEL
- Axiomatic design in practice
The foundation for Robust Design ties to Axiomatic Design - the key elements is that if you can reduce the amount of information in a design - then do it!
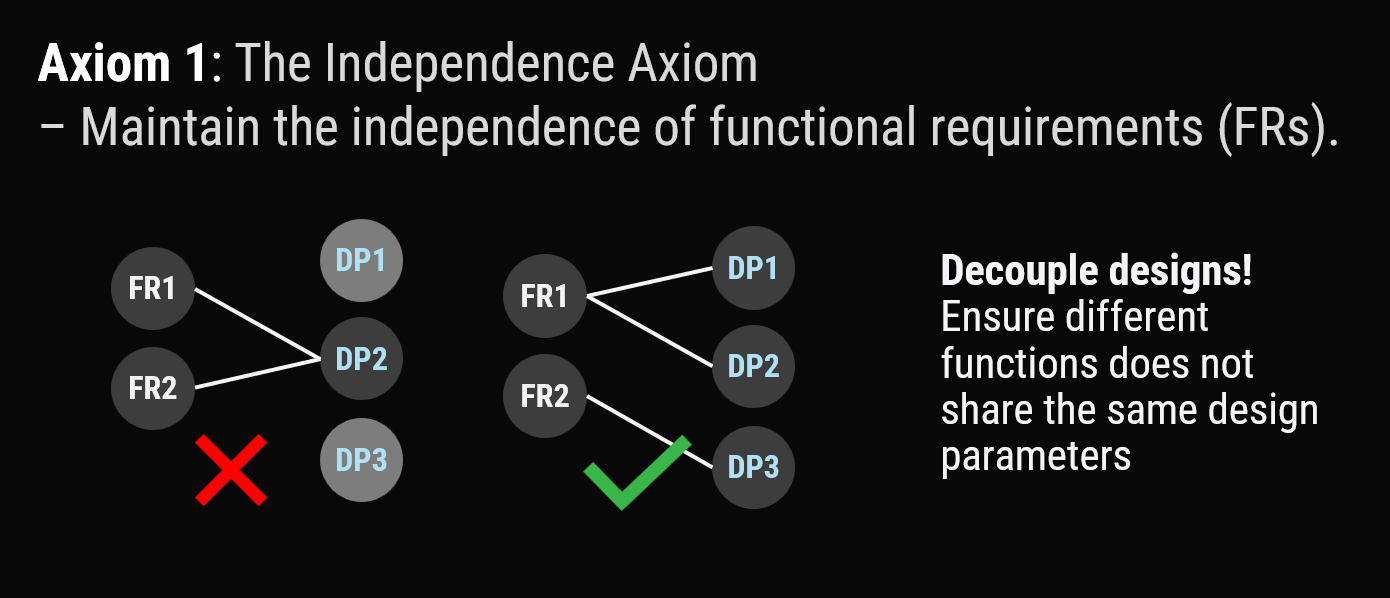
Axiom 1 | The Independence Axiom
Maintain the independence of the functional requirements.
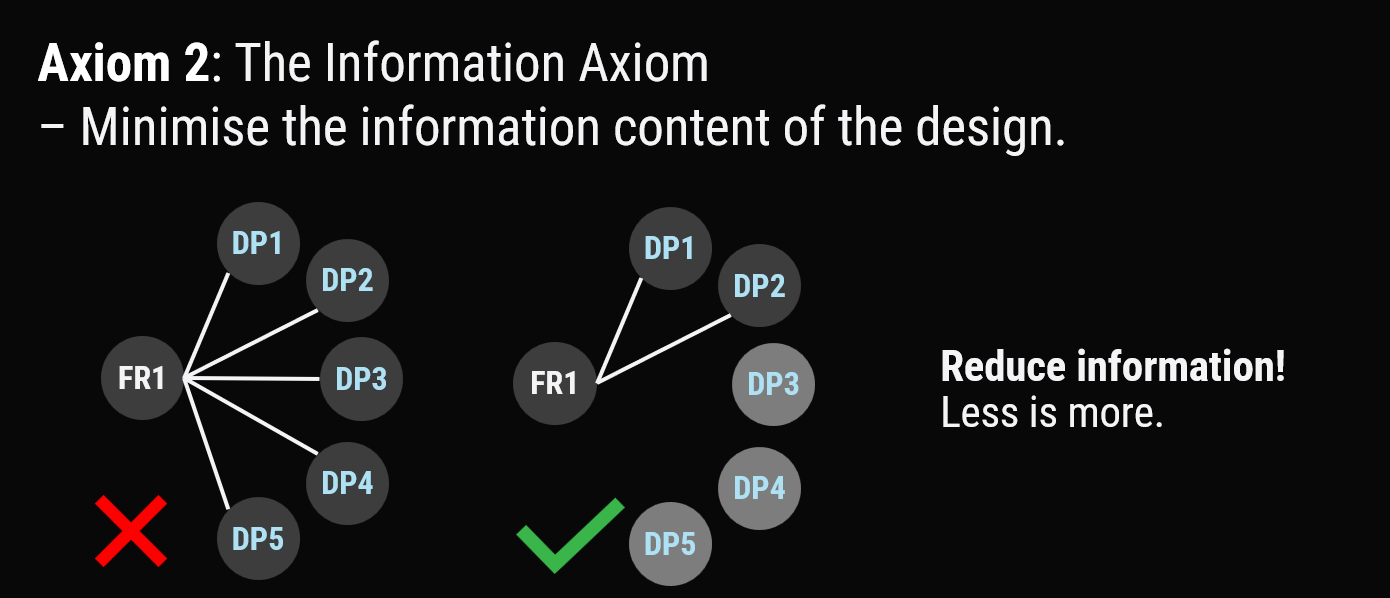
Axiom 2 | The Information Axiom
Minimize the information content in a design.
When dealing with mechanical models indented for mass production - it is paramount to understand the logic behind cause and effect. You want to be in control. You want the exact amount of information to be in control. No more, no less.
A crucial element for archiving high quality and reliability in mass production is to master tolerance stacks. When doing and reviewing tolerance stacks - you want to trust the calculations. The first thing you want when setting up a tolerance stack is predictability - a clear tolerance path (tolerance chain).
What is often overlooked are potential overconstraints in an interfaces between the mating parts.
So in essence you:
- Don't know which features that defines your tolerance stack
- Over specify drawings to counteract
- Missing to specify important dimensions
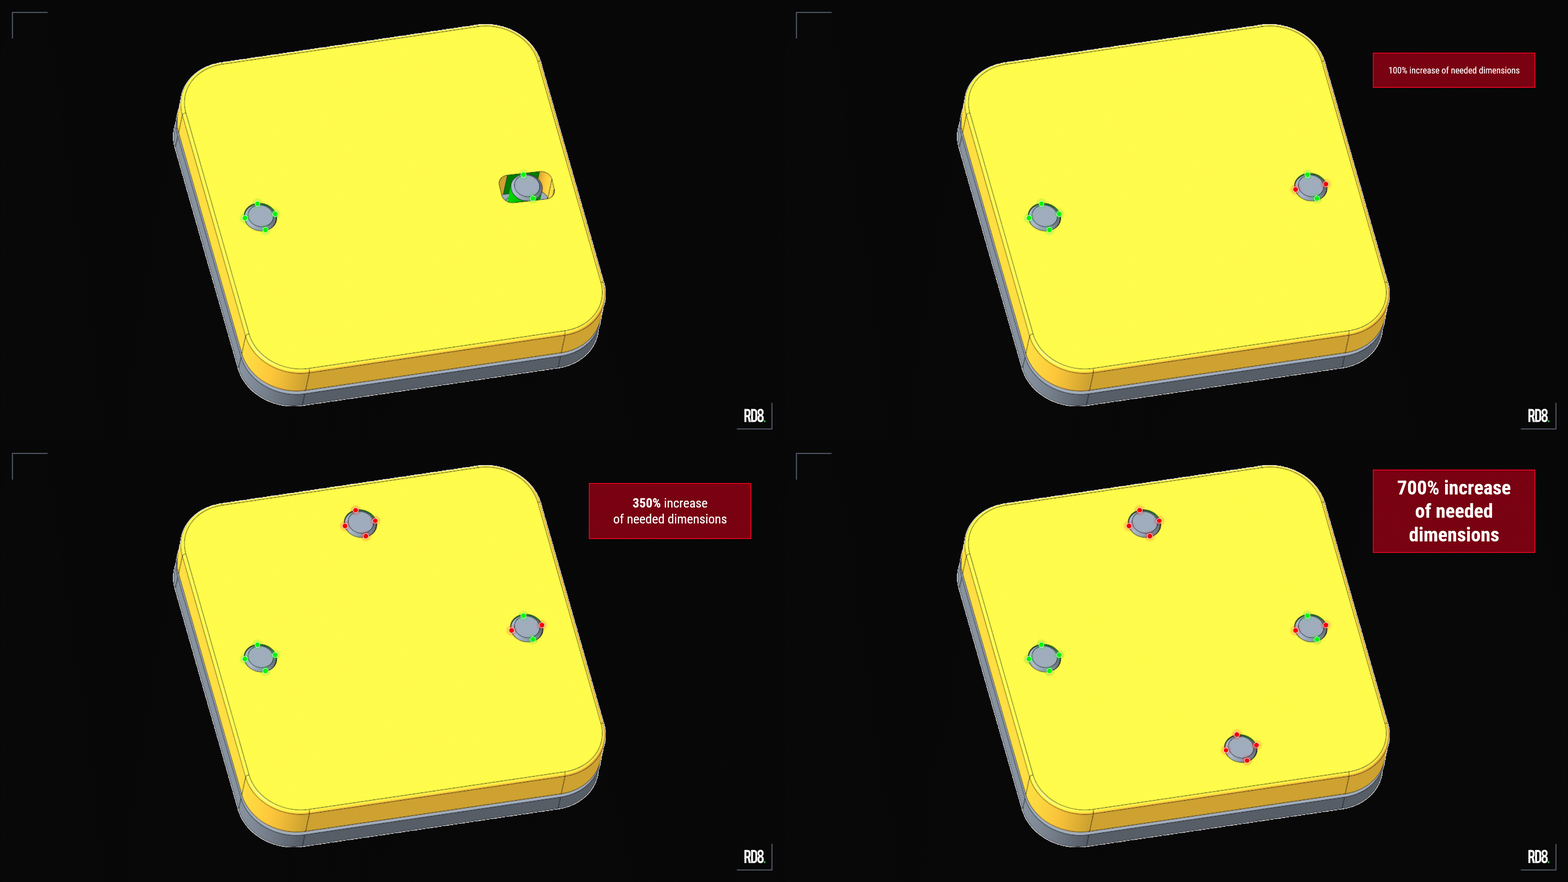
If you in example have 4 positioning features between two parts like shown below - the result is 5 overconstraints - which results in a staggering +700% increase in needed dimensions.
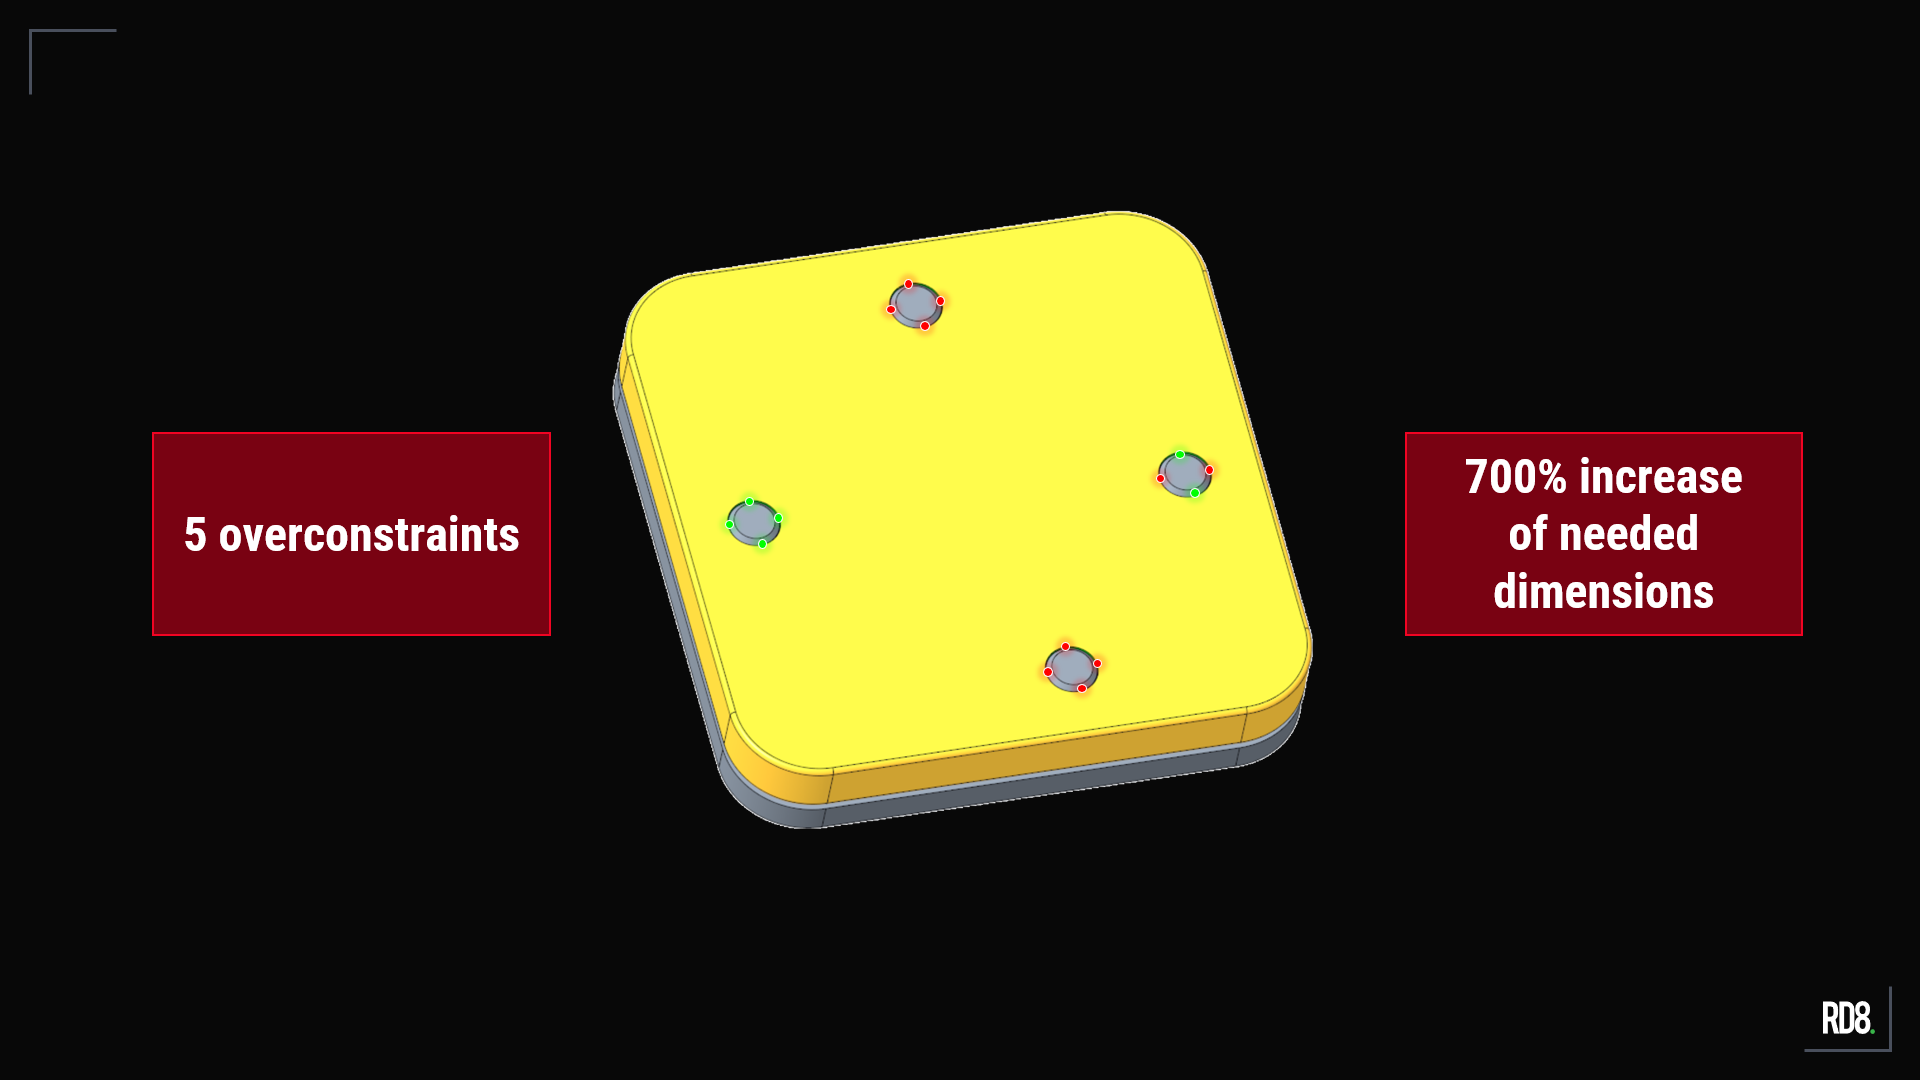
Time is lost for firefighting. Quality is lost. Too many parameters needs to be controlled to guarantee quality.
The usual 'go to' strategy is to improve manufacturing and processes instead of making better designs.
The breakdown
Let's examine an interface between two parts. For simplicity - let's only focus on the constraints in the xy-plane.
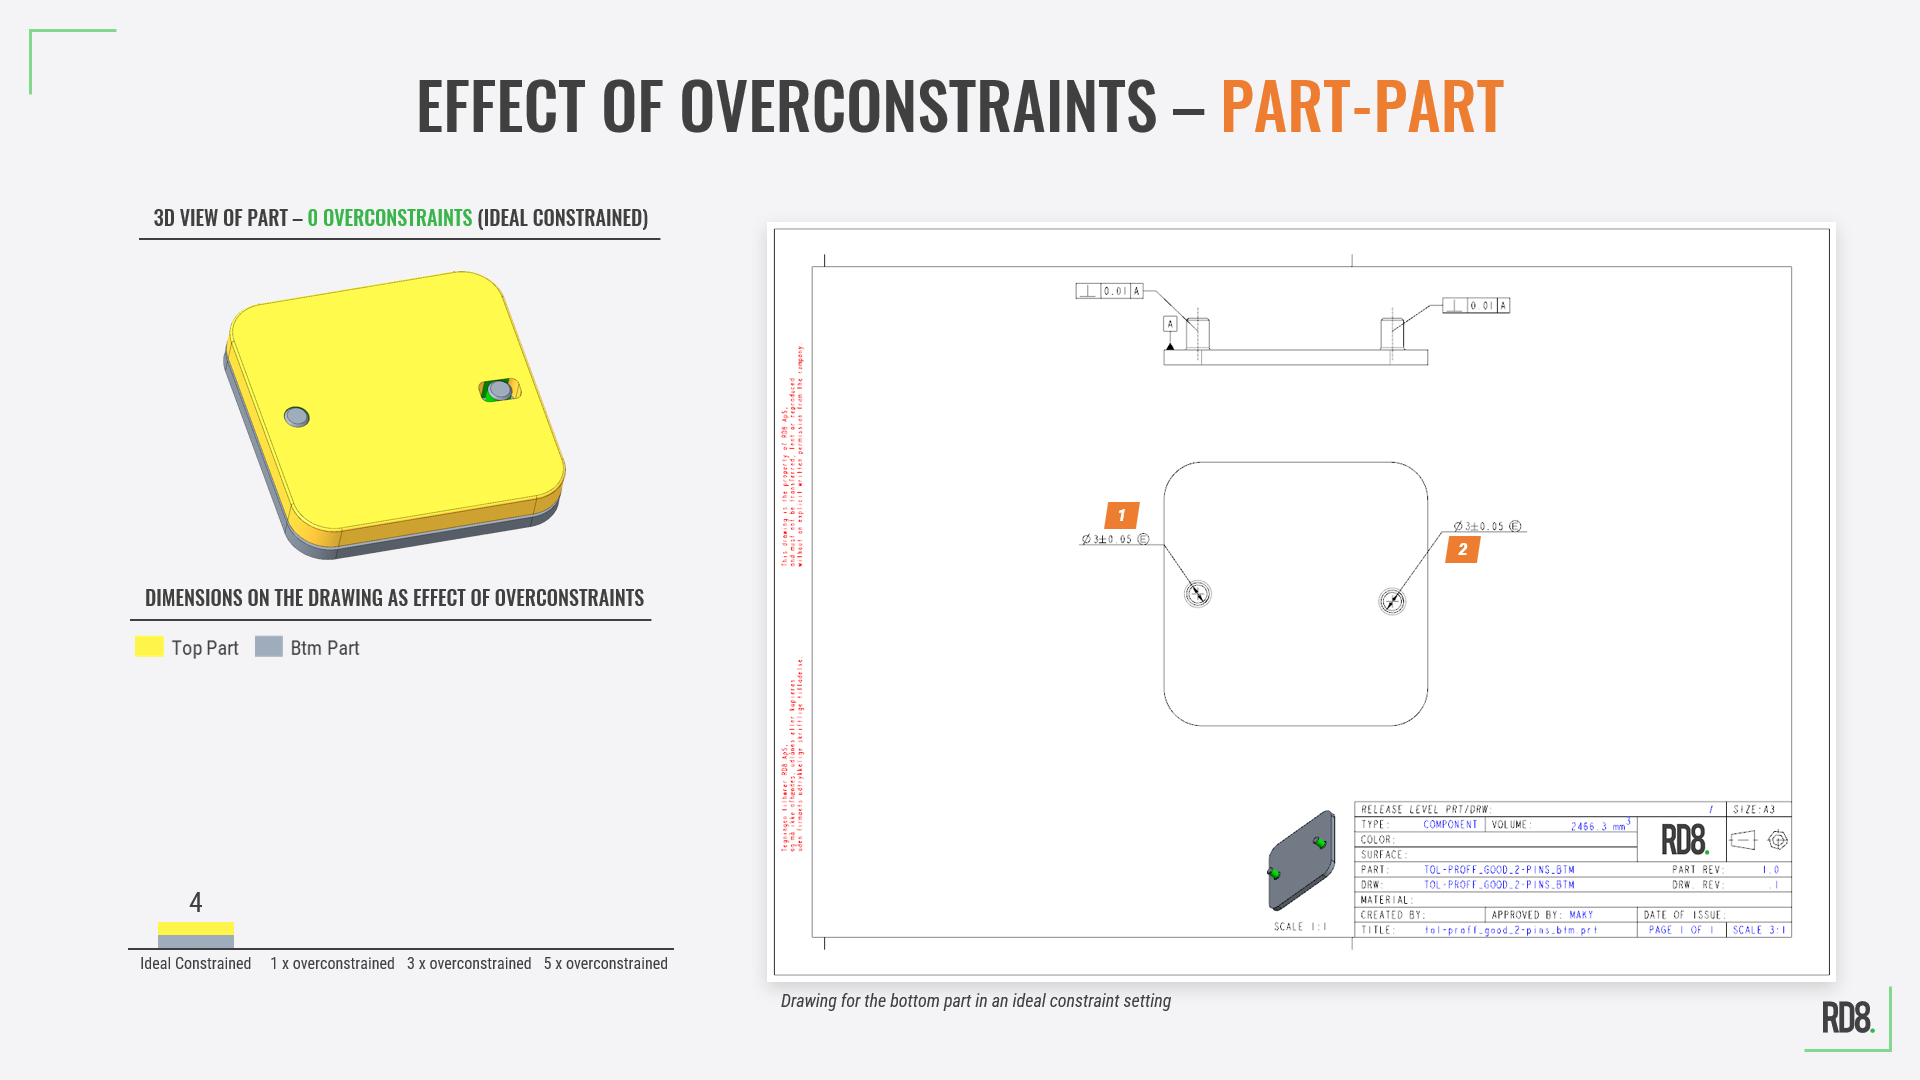
Zero Overconstraints
- A grey bottom part "Btm Part" - with two pins.
- A yellow top part "Top Part" - with a hole and an oblong hole.
This would be characterized as a Robust Design - if reviewed by the 'Interface X-ray Engine' in RD8 - you would see a clear datum scheme and zero overconstraints.
Let's say we want to be able to ensure predictability in the positioning scheme between the two parts.
- For the "Btm Part" we would need to dimension the two pin diameters. 2 dimensions.
- For the "Top Part" we would need to dimension the diameter of the hole on the left hole and the sloth width of the oblong hole. 2 dimensions.
- 4 dimensions in total.
One Overconstraint (The Lost Detail)
If just a little detailed is missed - let's imagine that the yellow part does not feature an oblong hole - the result is one overconstraint in the interface (could automatically be identified by RD8 Software) - then suddenly:
- For the "Btm Part" we need to consider the distances (x-y coordinates) between the pins. 2 additional dimensions.
- For the "Top Part" we need to consider the distances between the holes. 2 additional dimensions.
- 4 additional dimensions in total. 8 in total.
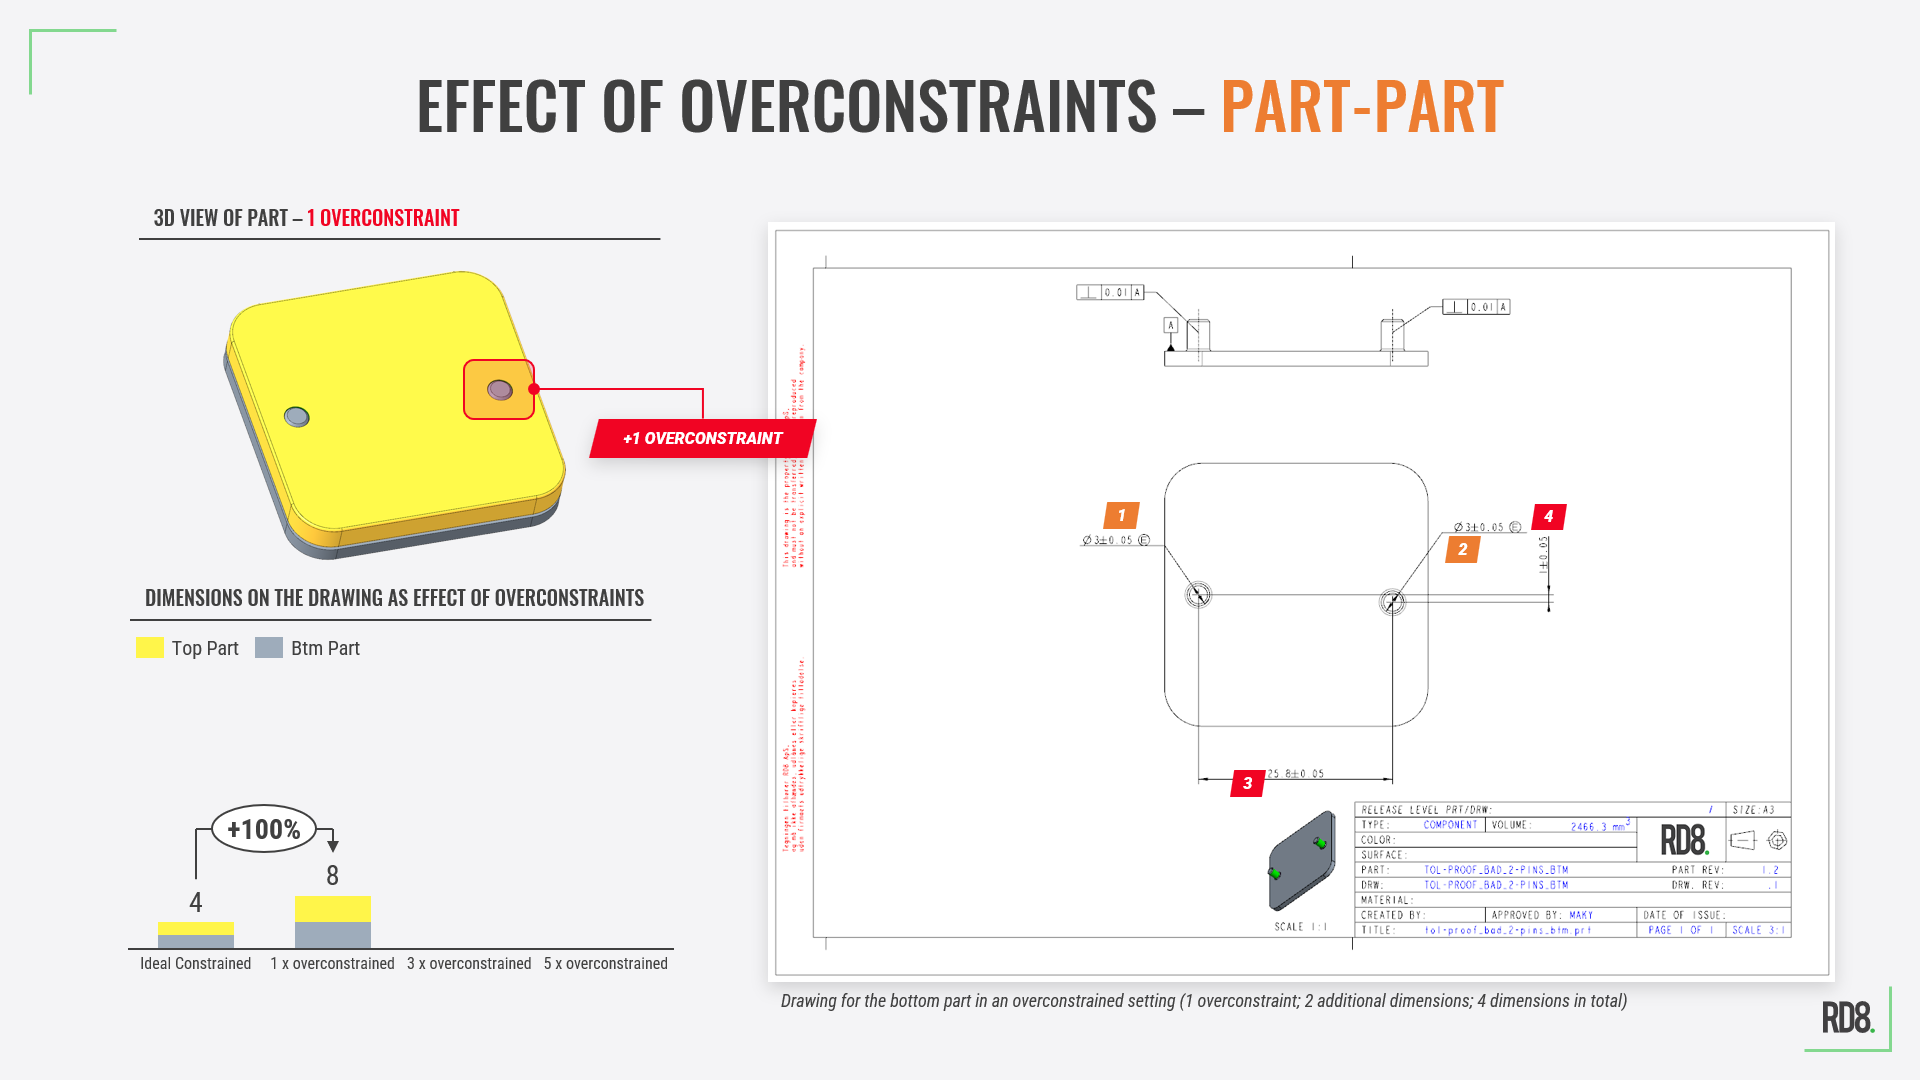
A 100% increase of dimensions.
Three Overconstraints (Three Pins)
Imagine that the designer wants extra strength of just even more precision in the interface - and decides to add an extra pin. An extra pin will result in two additional overconstraints. 3 overconstraints in total. Again this is automatically reveal by the RD8 Interface X-ray function.
Now it's starts to get complicated.
- For the "Btm Part" - the extra pin diameter. Ideally we need to consider the x-y coordinates between the 1st pin to the 2nd pin, 1st pin to 3rd pin and 2nd pin to 3rd pin. 5 additional dimensions.
- The same for the counter part - the "Top Part". 5 additional dimensions.
- 10 additional dimensions in total. 18 in total.

Three overconstraints = 350% increase of dimensions.
Five Overconstraints (Four Pins)
Let's say that the designer adds another pin for symmetry. Another pin results in 2 additional overconstraints. 5 overconstraints in total.
- For the "Btm Part" - an extra pin diameter. Ideally we need to consider all the possible relations between the pins. If just one dimension is off - either it will be impossible/difficult to assembly or the positioning scheme between the parts is gone - and hereby the predictability.
- The same for the counter part - the "Top Part". Ideally we need to consider all the possible relations between the holes.
- 14 additional dimensions in total. 32 in total.
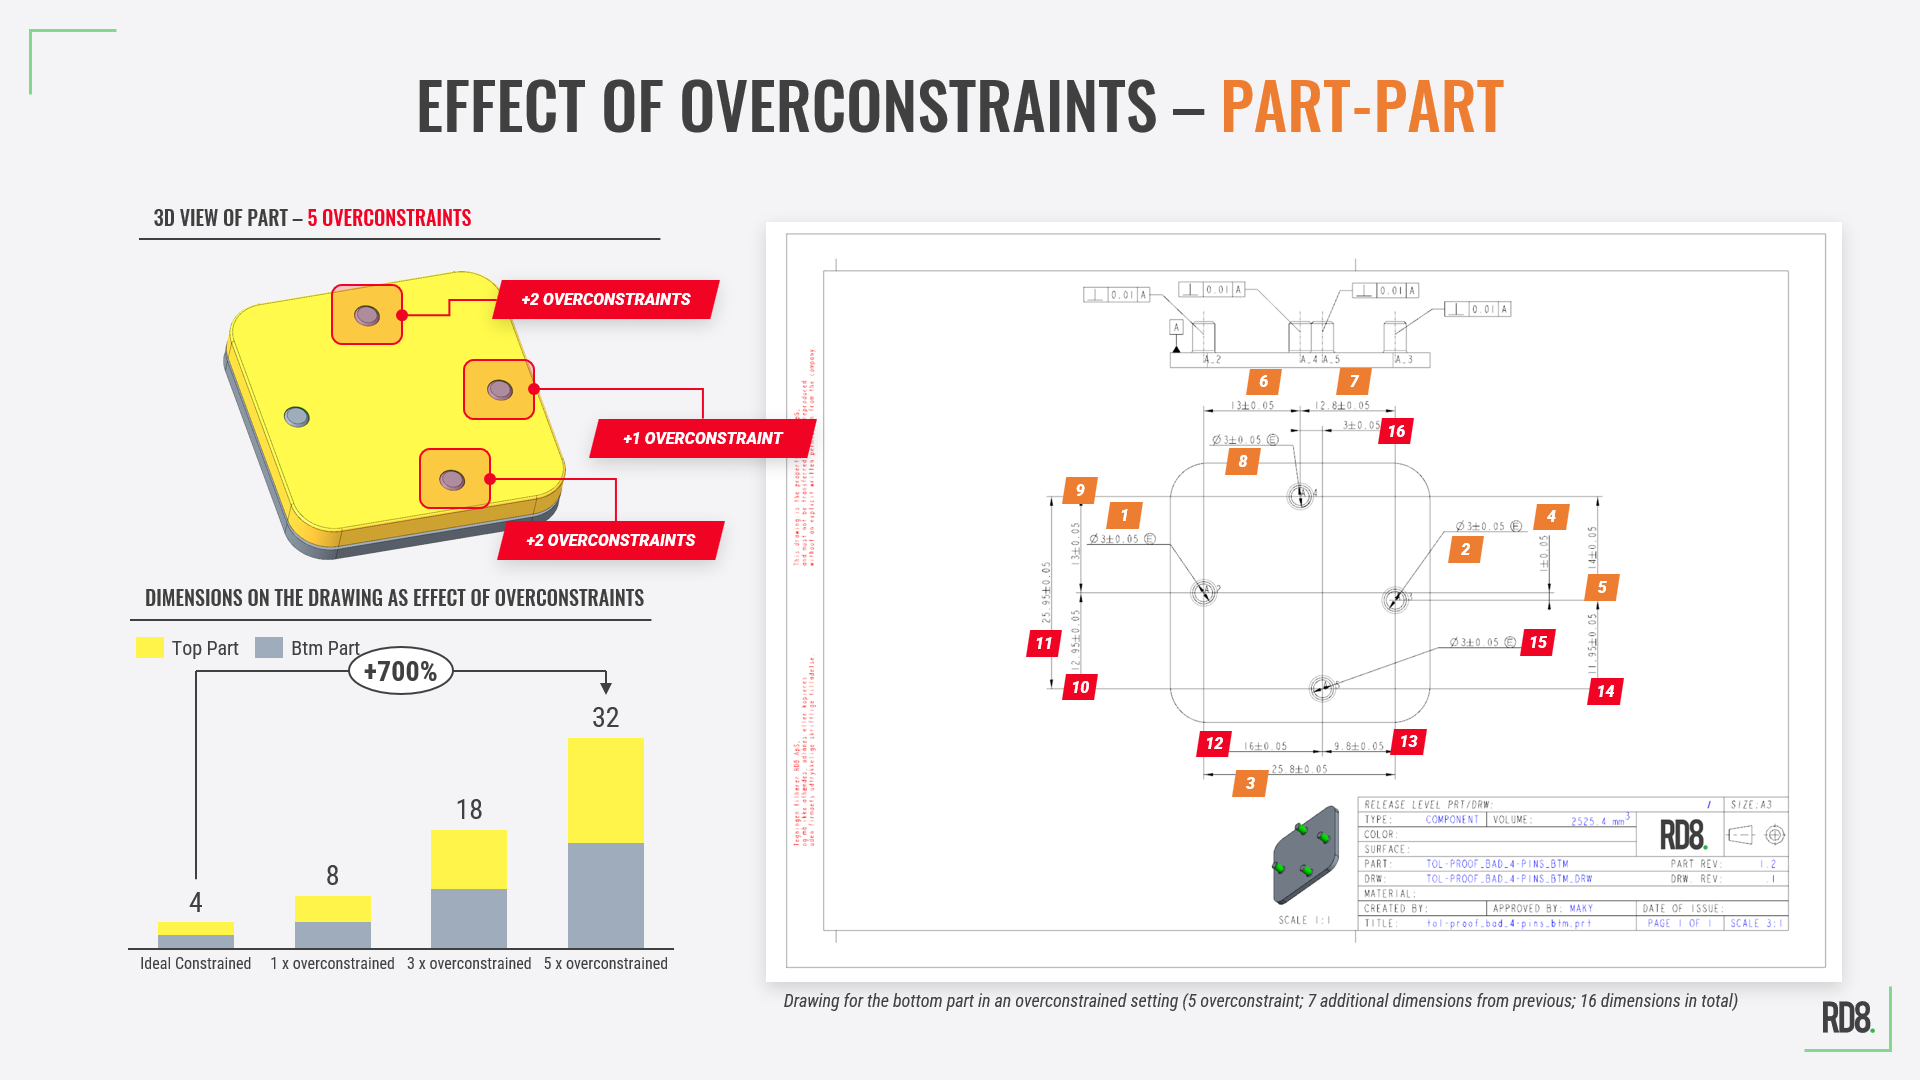
A staggering 700% increase of needed dimensions compared to the starting point - the ideal constrained design.
It might seem like an extreme example. But in reality 5 overconstraints in an interface is more a commonality than an ideal interface design.
The Takeaway - Why? Clean Interface = Easy Tolerance Analysis.
Imagine a tolerance stack with 8 parts - resulting in 7 interfaces - with each 2-5 overconstraints.
Predictability is gone.
Control is gone.
Complexity has exploded.
In reality only a few of the dimensions have been marked on the drawings.
Test results are not reliable.
Typically the countermeasure is to improve manufacturing, tightening tolerances, increased QA, ..., endless testing.
Finally - it works - don't touch it.
Not to reflect on any cost related manners.
The Robust Design way would have been to ensure no overconstraints and optimize the tolerance stack to gain max control and cater for Axiom 2.
The lesson. A few overconstraints may seem like not noteworthy details but actually drives the need for 700% more dimensions.
The last centuries European and American companies have been focusing on improved manufacturing processes rather than better mechanical designs. Meanwhile there is a giant potential to improve!
RD8 Software has automated the detection of overconstraints directly from a CAD model to simplify designs before doing tolerance stacks on a poor basis. Cleaning interfaces before tolerancing to gain quality and speed.
The effect of robust design
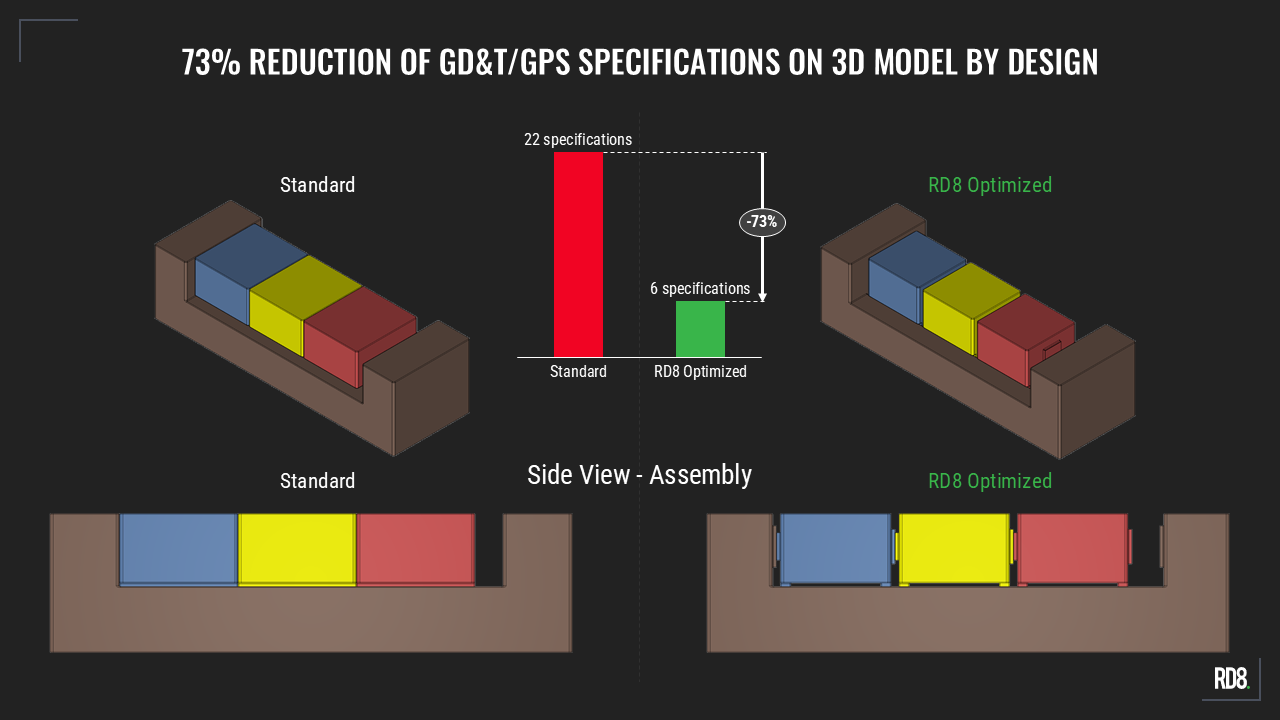
At first sight, the Standard and RD8 Optimized designs appear comparable. However, the RD8 approach delivers a 73% reduction in GPS specifications, resulting in a significantly simpler and more cost-effective design. By minimizing geometric constraints and reducing tolerance sensitivity, the RD8 Optimized concept enhances manufacturability, robustness, and assembly performance. The following analysis illustrates the design principles behind these improvements.
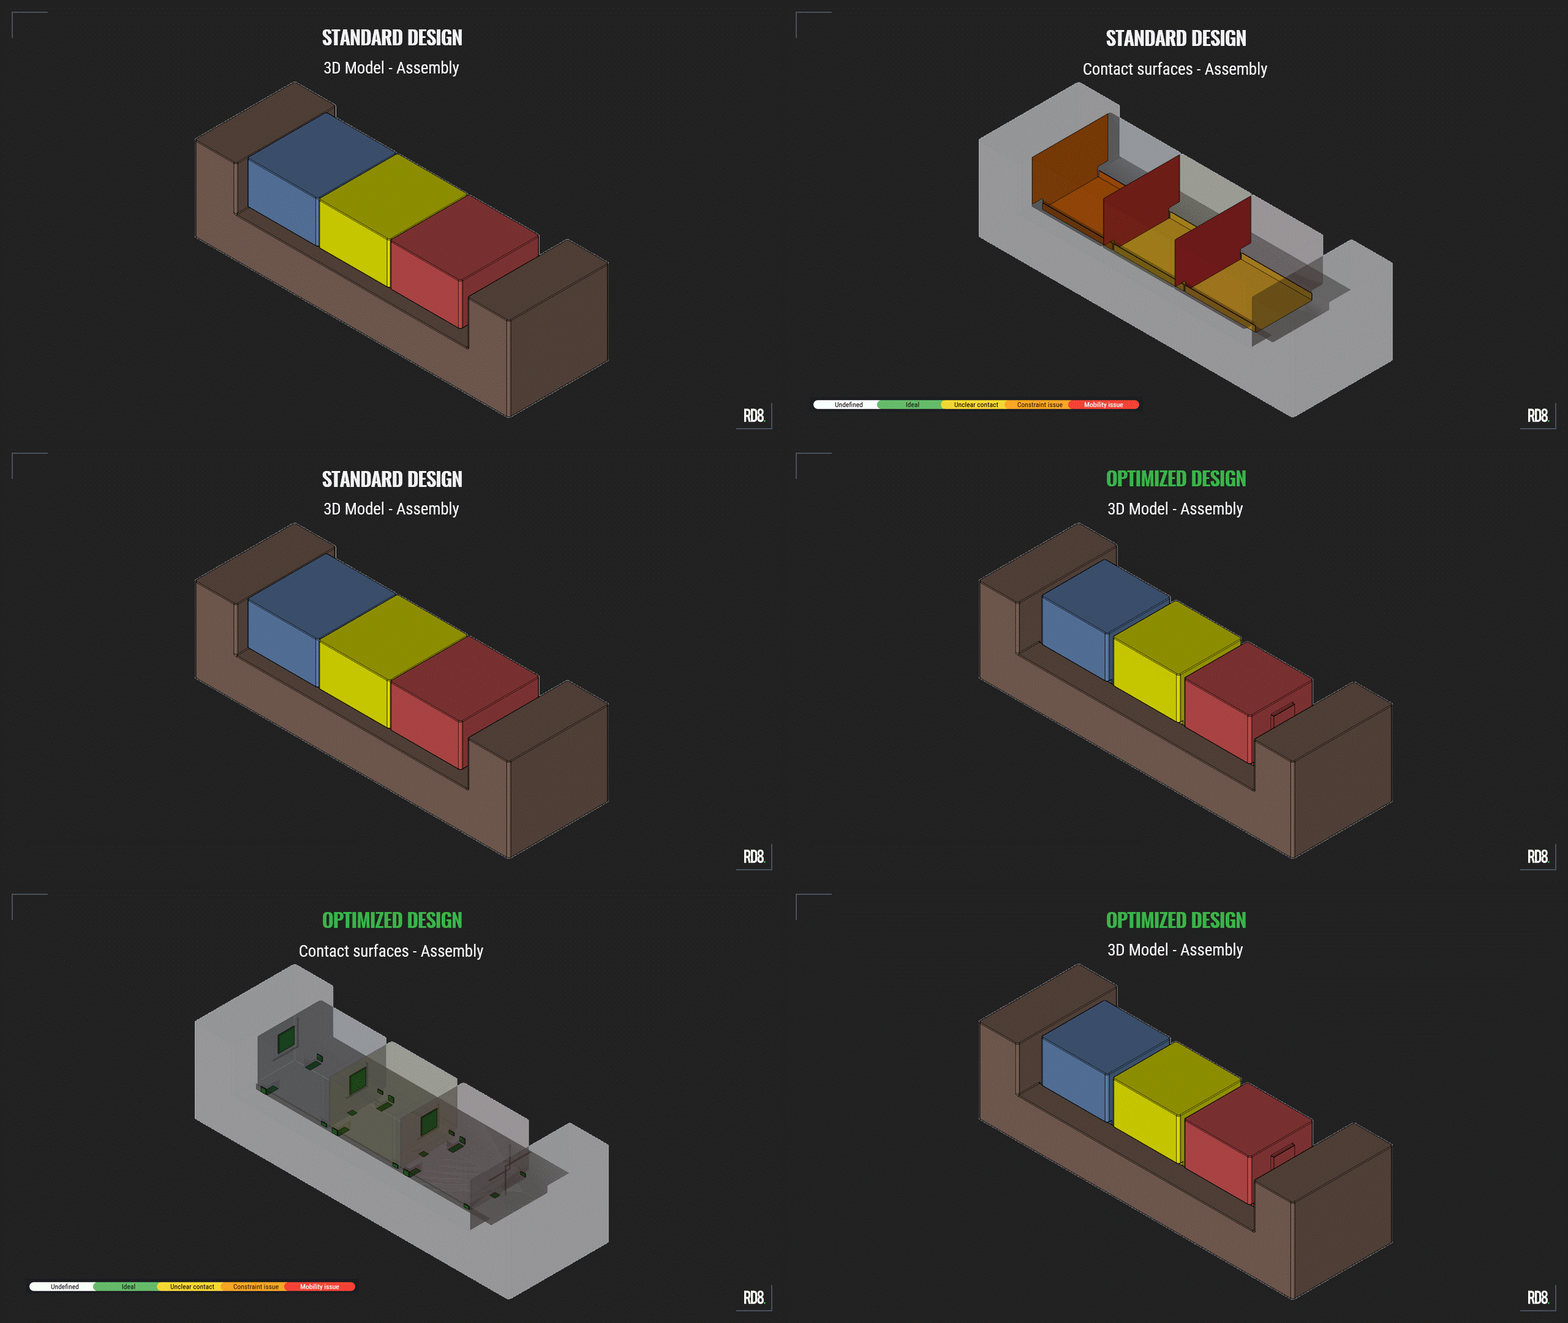
The benefits of the RD8 Optimized design become evident when comparing the contact interfaces generated and assessed through RD8 software. The analysis highlights a substantial reduction in contact surface area and a transition from an overconstrained design to an ideally constrained one.
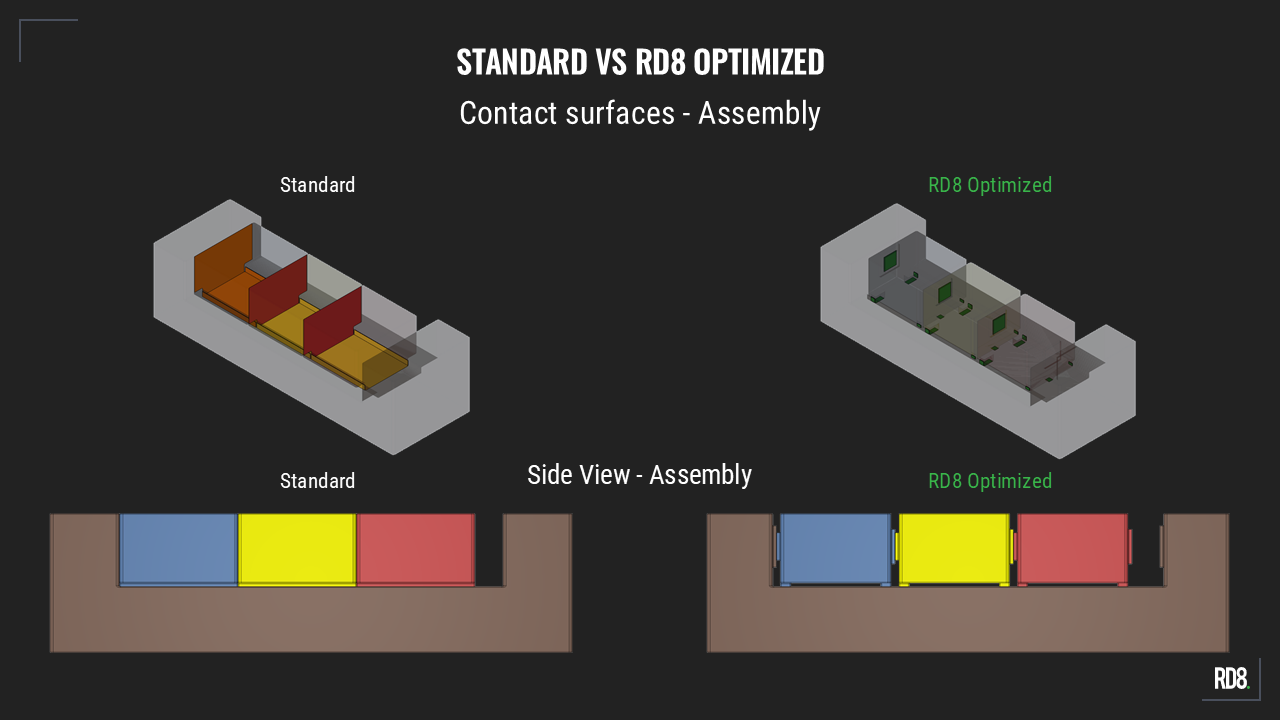
The standard design contains multiple extended contact surfaces, which require numerous geometric specifications to ensure functional performance. These additional controls increase manufacturing and inspection costs, making their reduction a critical objective for design optimization.
The optimized design is the result of applying RD8 Robust Design principles. The contact strategy is simplified and more clearly defined, replacing complex interface surfaces with functional contact features. The result is a more robust, manufacturable, and cost-effective design.
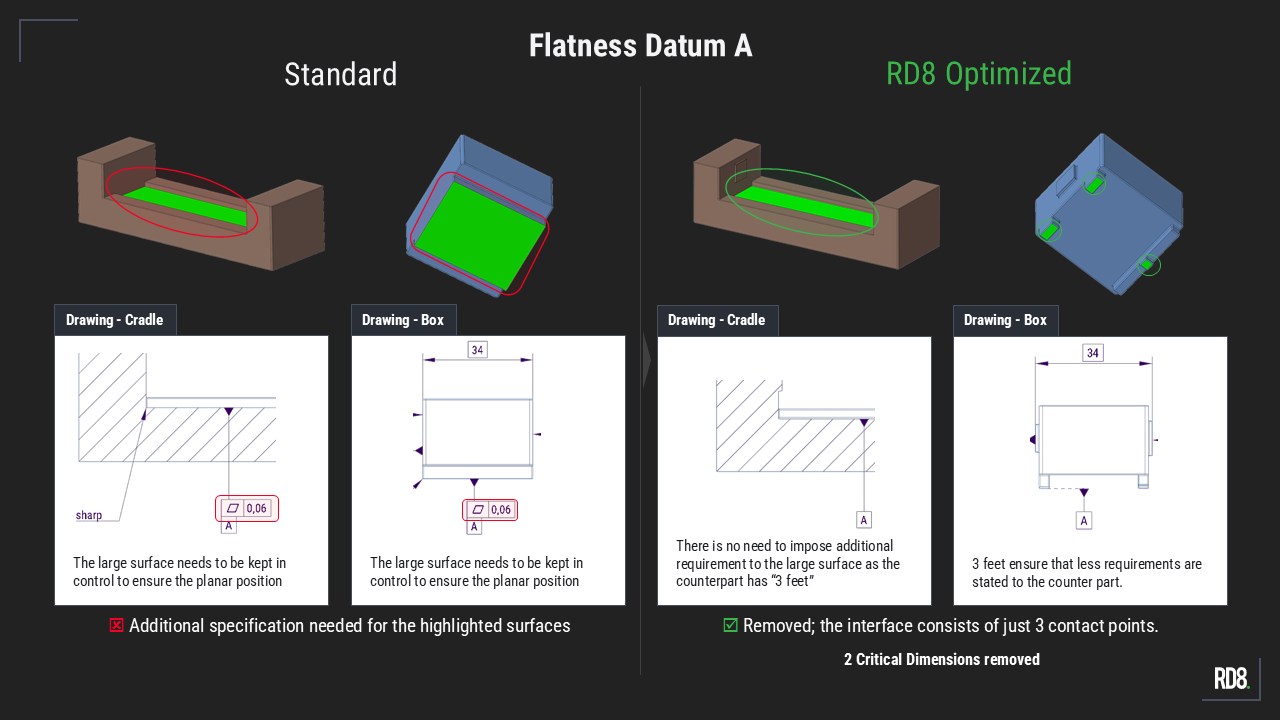
Flatness Datum A
The Standard design requires a flatness specification on Datum A due to the large box-to-cradle interface surface. Controlling flatness is essential to ensure proper assembly and smooth box movement along the guideway. The RD8 Optimized design uses three discrete contact points instead of a continuous surface, removing the need for a flatness requirement and eliminating two critical dimensions.
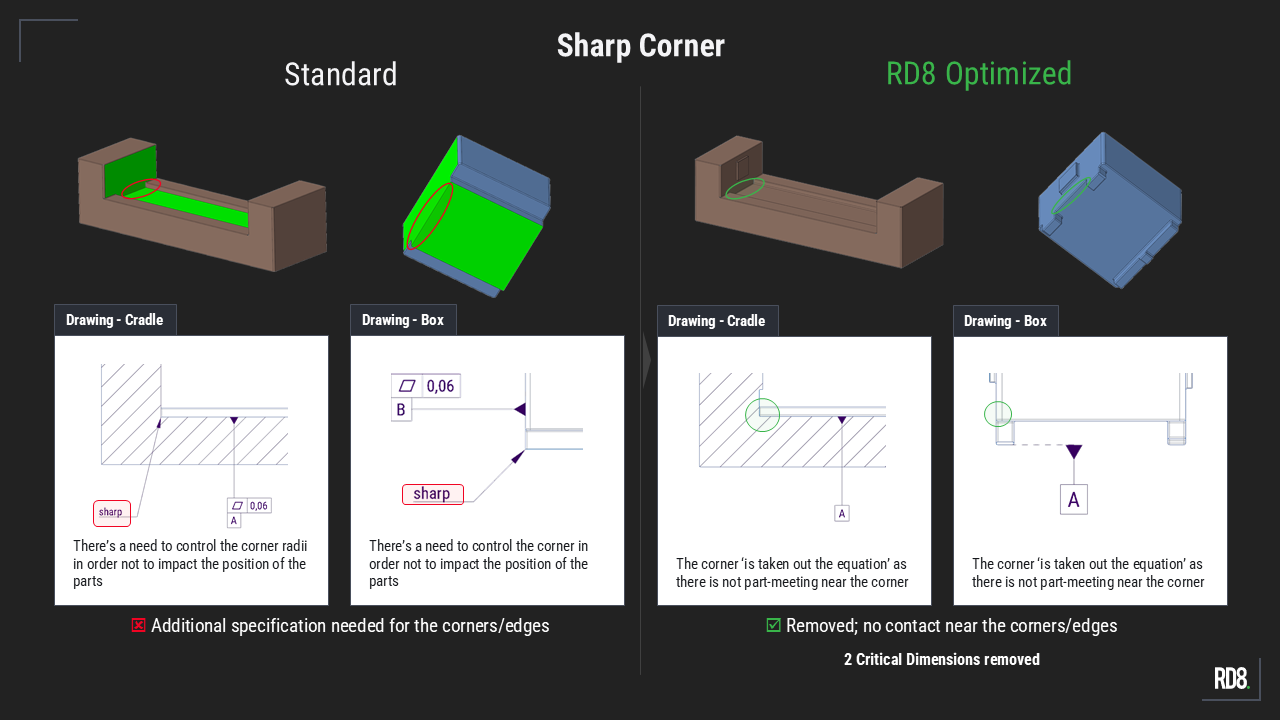
Sharp Corner
The Standard design features sharp-corner interfaces on both the cradle and the box. This creates a critical assembly risk, as manufacturing variations, edge defects, or burrs can prevent proper contact between the mating features. To mitigate this risk, the RD8 Optimized design relocates the interface away from the corner and establishes contact at a single, well-defined point. This approach significantly reduces sensitivity to manufacturing tolerances, improves interface robustness, and enhances overall assemblability.
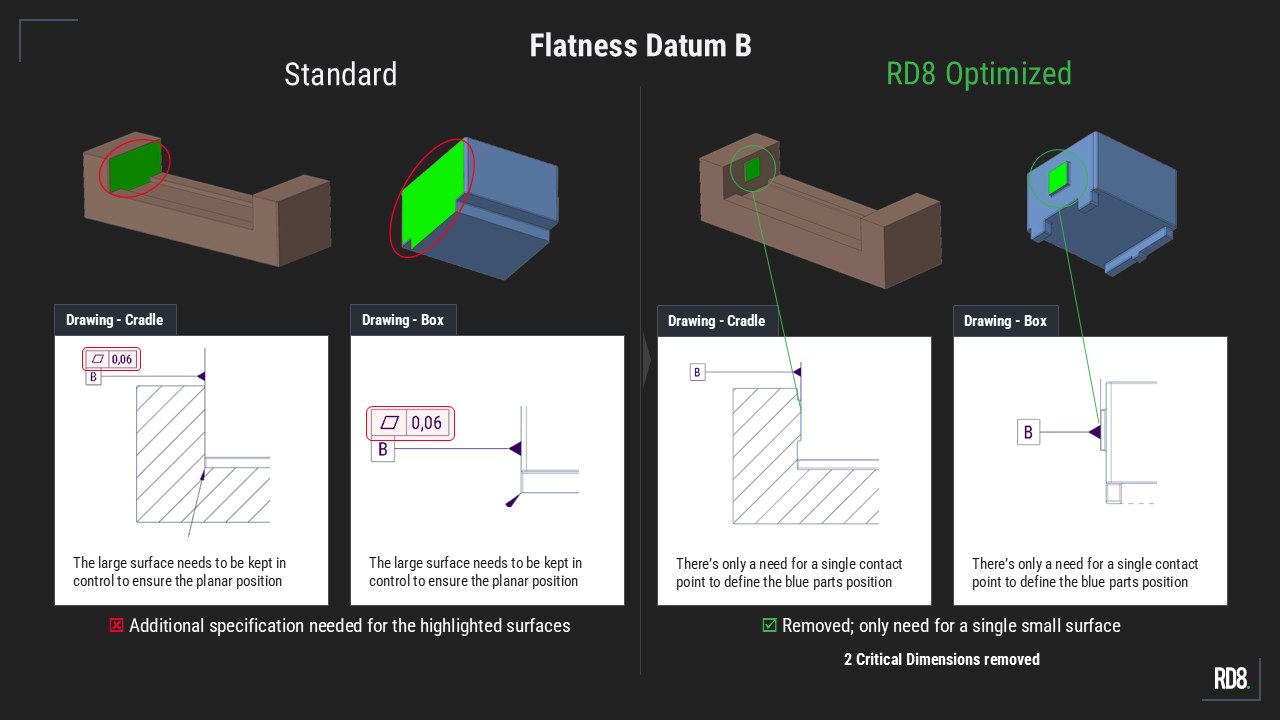
Flatness Datum B
Similar to Datum A, the Standard design requires a flatness specification because the interface spans a large contact surface, where controlling the surface geometry is necessary to ensure proper assembly. In contrast, the RD8 Optimized design reduces the interface to a single contact point, eliminating the need for a flatness requirement. This simplification improves robustness while removing two critical dimensions from the design.
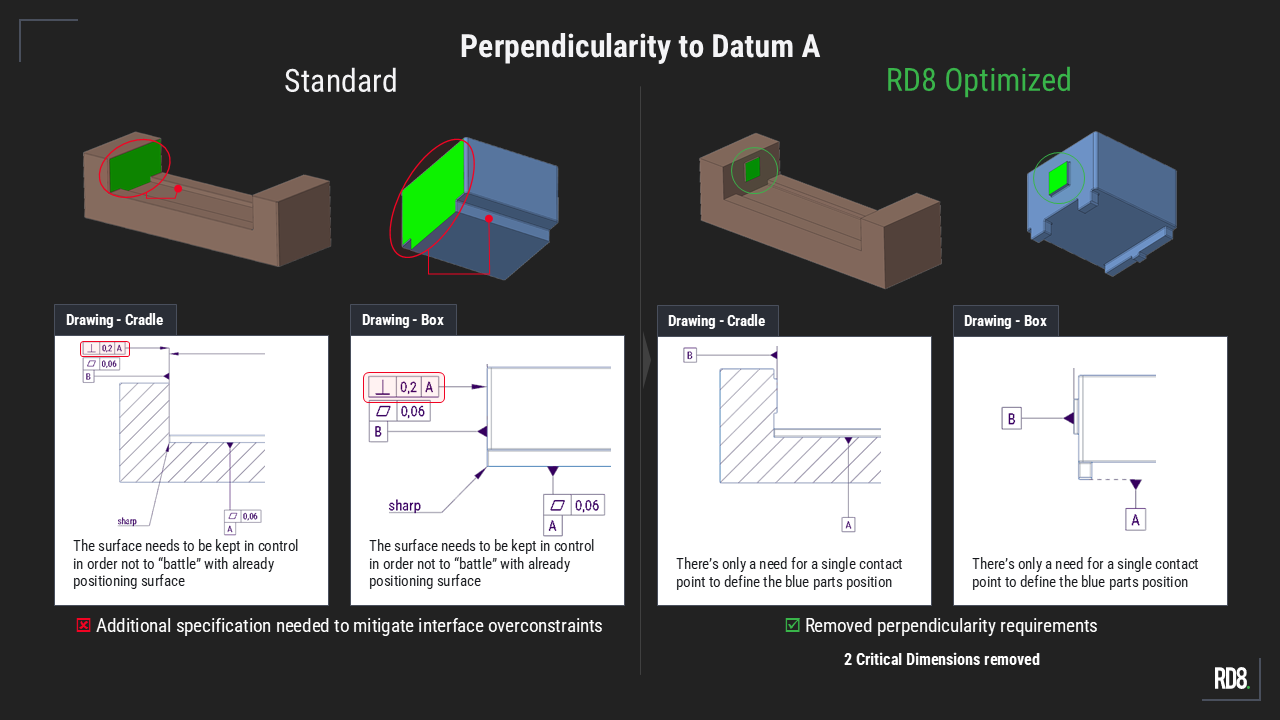
Perpendicularity Datum B to Datum A
The Standard design relies on an extended interface surface and therefore requires perpendicularity control between Datum B and Datum A to ensure proper box-to-cradle fit and alignment. The RD8 Optimized design uses a single-point interface, eliminating the need for perpendicularity control and removing two critical dimensions, resulting in a simpler and more robust design.
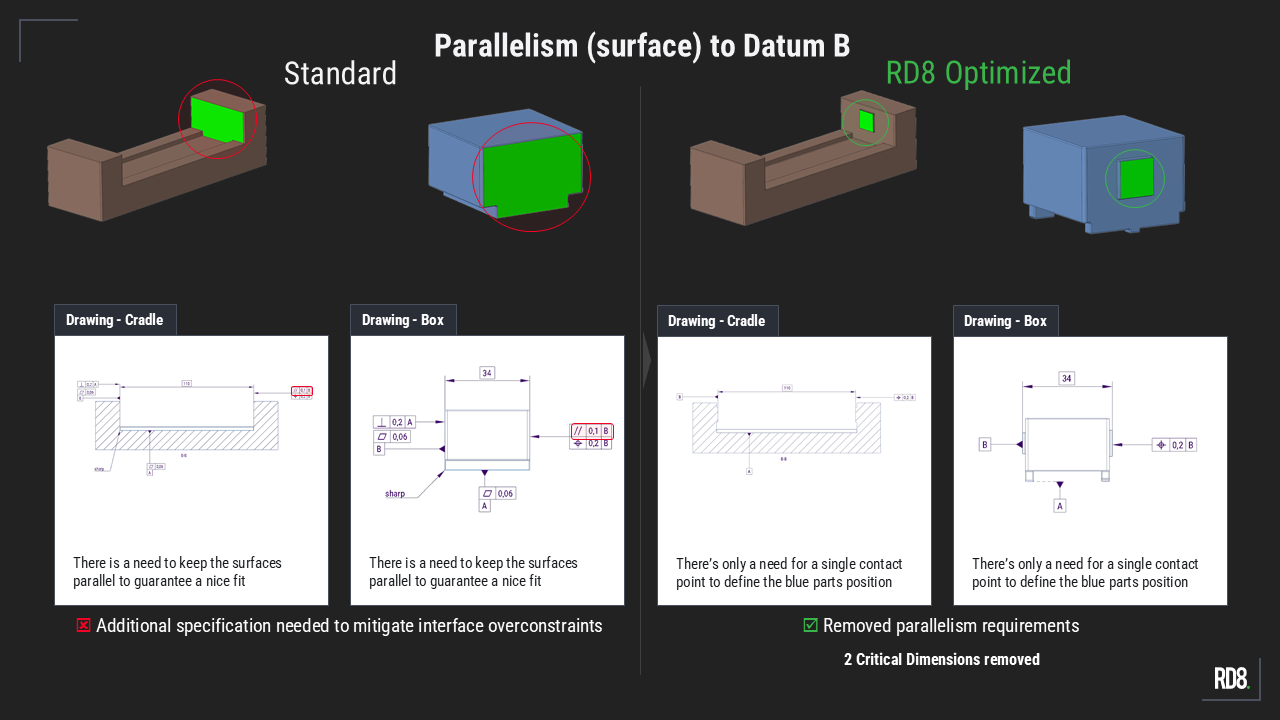
Parallelism (surface) to Datum B
The Standard design depends on the parallelism of the mating surfaces to guarantee proper interface engagement. Any deviation can affect the assembly condition and functional positioning of the box. By replacing the surface-to-surface interface with a localized contact feature, the RD8 Optimized design becomes less sensitive to surface orientation variations, allowing the parallelism specification to be removed and reducing the number of critical dimensions by two.
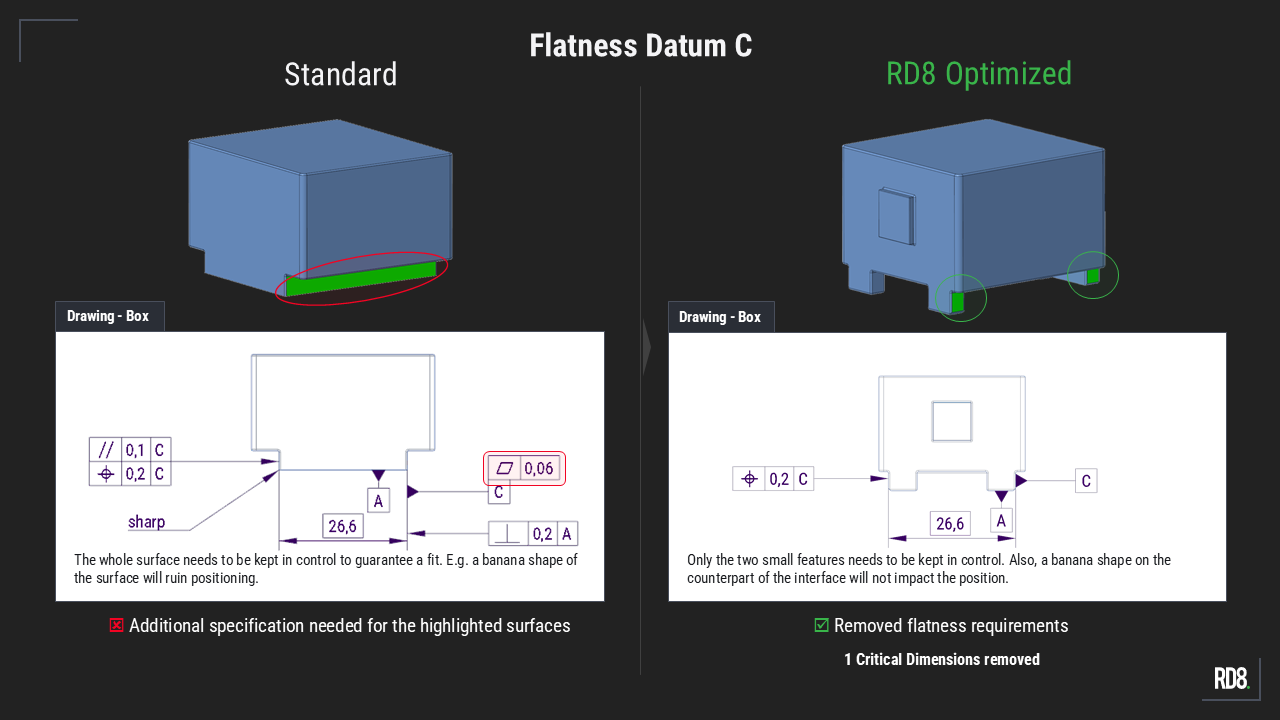
Flatness Datum C
In the Standard design, Datum C is defined by an extended contact surface, requiring a flatness specification to ensure a stable and repeatable interface condition. The RD8 Optimized design replaces the continuous surface with two discrete contact features, making the interface independent of overall surface flatness. As a result, the flatness requirement can be removed, eliminating one critical dimension and reducing complexity.
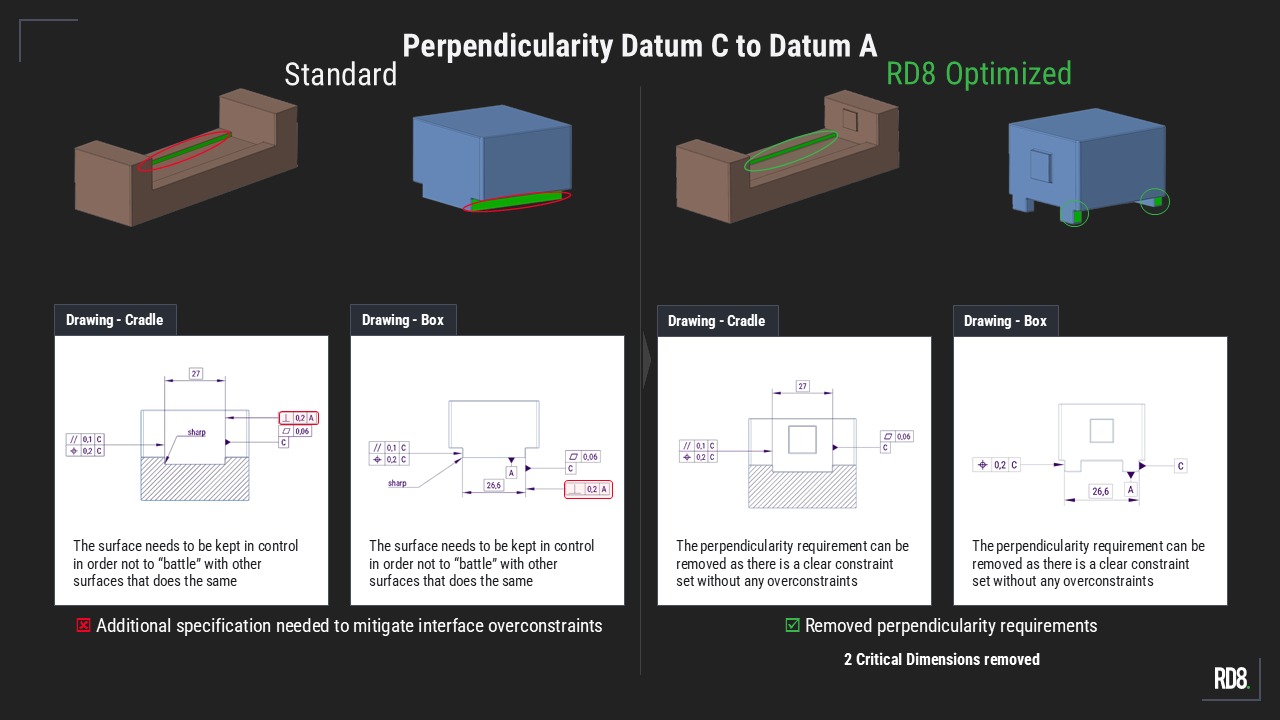
Perpendicularity Datum C to Datum A
The Standard design relies on the orientation of the mating surface to achieve the intended interface condition. As a result, perpendicularity between Datum C and Datum A must be controlled to prevent variations in contact and positioning. In the RD8 Optimized design, the functional interface is defined by two discrete contact points, making the concept inherently less sensitive to angular deviations. Consequently, the perpendicularity requirement can be eliminated.
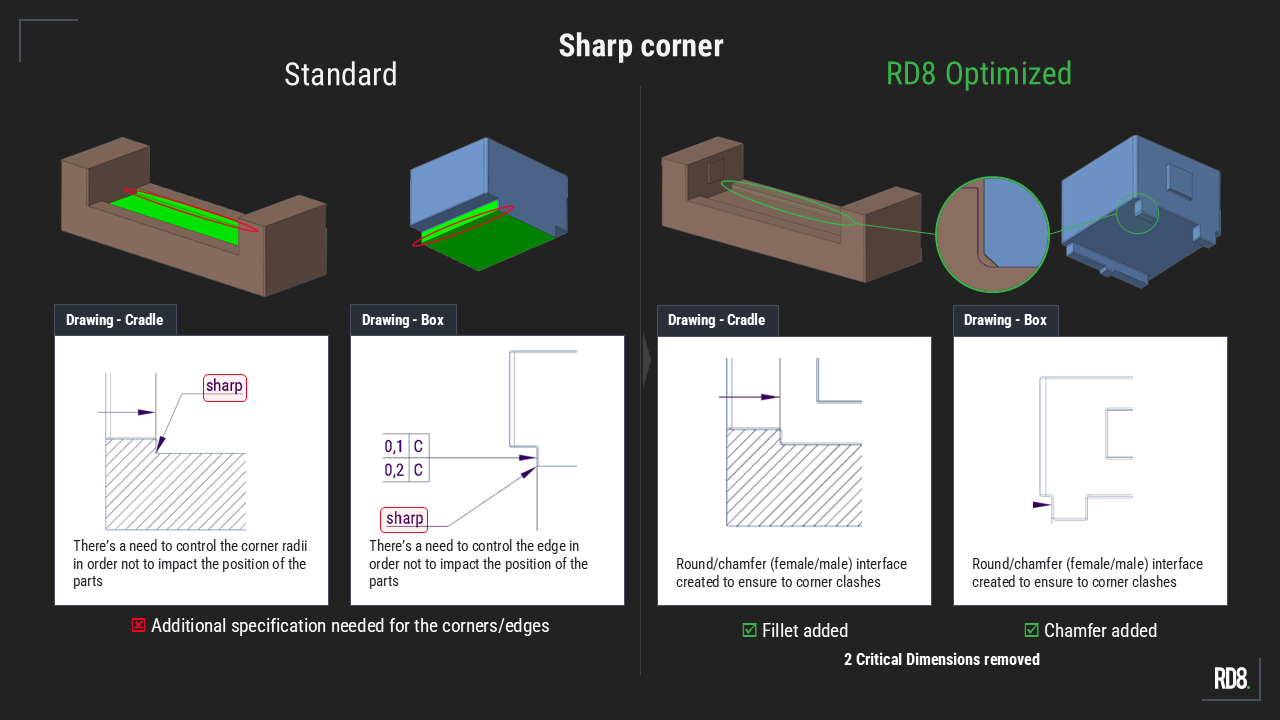
Sharp corner
The Standard design relies on corner-to-corner contact, making interface performance highly dependent on the quality of the manufactured edges. Even minor defects can alter the contact condition and affect repeatability. By replacing sharp corners with controlled geometric transitions (a fillet on the cradle and a chamfer on the box), the RD8 Optimized design ensures predictable engagement between the components and significantly reduces sensitivity to edge variation.
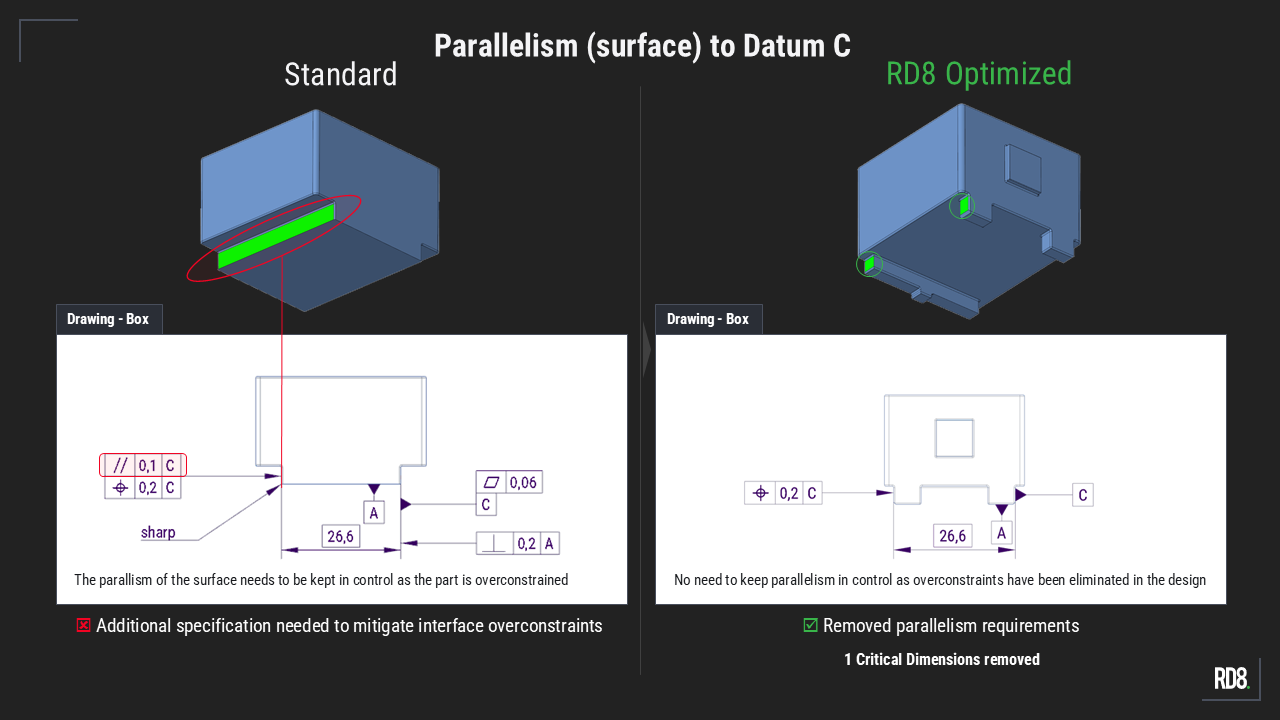
Parallelism (surface) to Datum C
In the Standard design, the box is guided by an extended sliding surface referenced to Datum C. To ensure smooth movement along the guideway, this surface must maintain a controlled parallel relationship to Datum C. The RD8 Optimized design replaces the continuous sliding interface with two localized contact features, significantly reducing sensitivity to surface orientation variations. This allows the parallelism requirement to be eliminated, removing one critical dimension while maintaining the intended guiding function.
Slider example:
Dynamic interface
In the adjacent video - two different designs are presented.
Overconstrained Slider Design
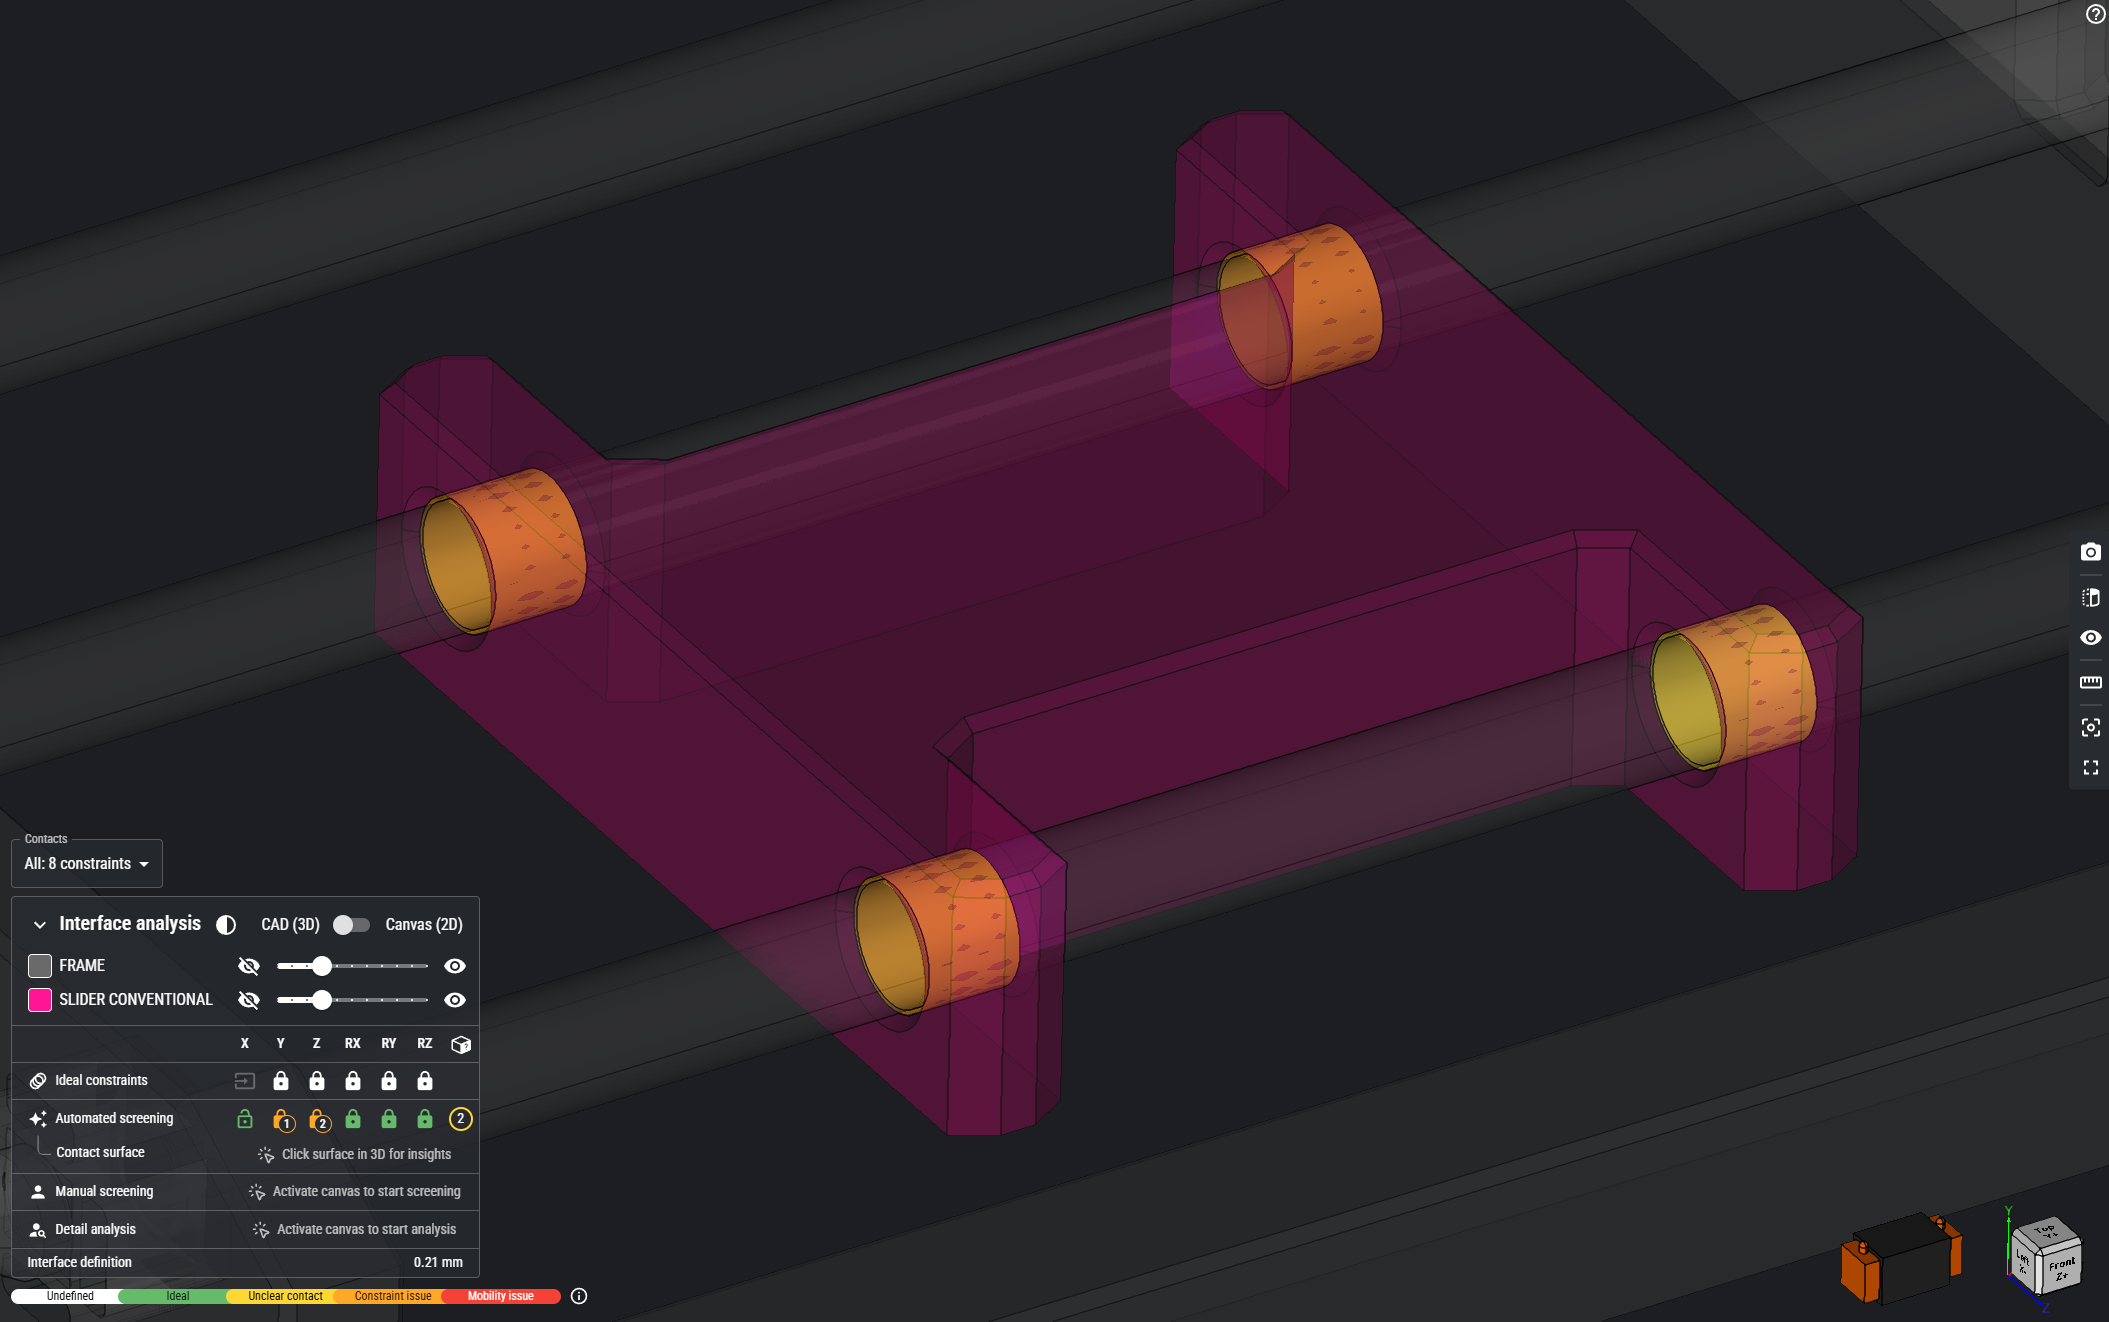
This design has 3 overconstraints.
- 2 z-overconstraints, imposing additional requirements to distance/parallalism is kept in control between the rails.
- 1 y-overconstraint, imposing additional parallalism requirements are kept in control.
RD8 Software illustrates this by orange contact surfaces between the parts in the 3D viewer.
To check if a design is overconstrained - imagine that one of the contact surfaces is moving in x-, y-, or z-direction. If the design cannot tolerate an imaginary movement of the interface, then the design is overconstrained. This is what RD8 Software automatically does for you in the interface analysis tool.
Perfect Constrained Slider Design
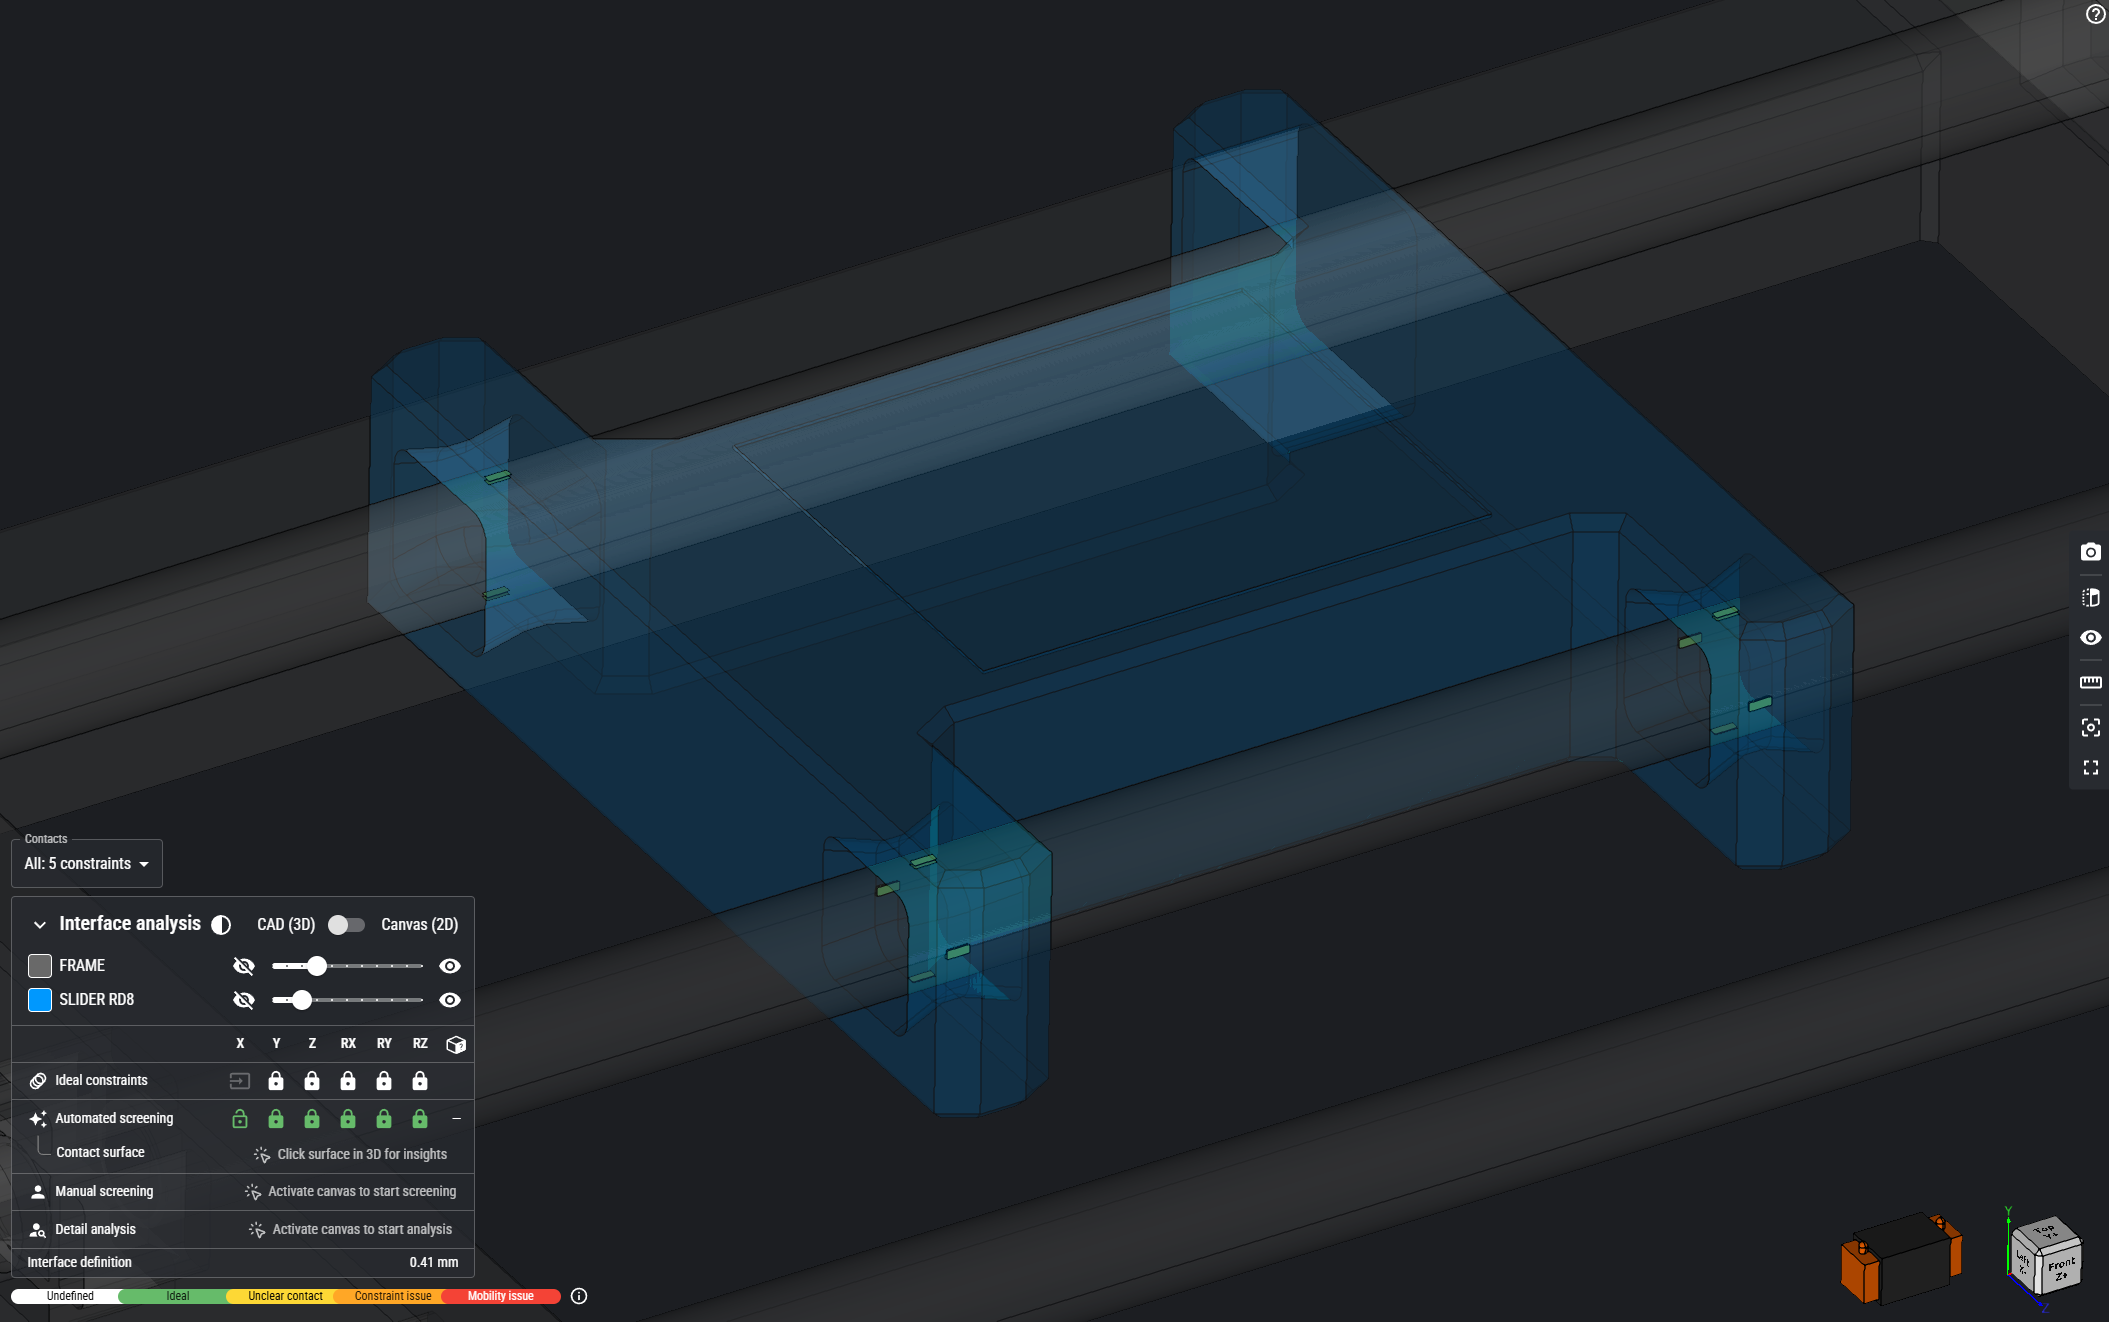
In a perfect constrained design - a solution with clearance the right places - it would only be the local fits between rails and hole diamteres that will be critical for success. Something that is much easier to control - than critical dimensions accross an assembly.
Compared to the overconstrained slider design - clearance have been added 3 places to mitigate the overconstraints:
- In 2 of the rail-fits clerance in z-direction have been added.
- In 1 of the rail fits clearance in y-direction have been added.
RD8 Software illustrates this by green contact surfaces between the parts -reflecting no overconstraints (no constraints battle each other - it is perfectly clear what the purpose is of each functional surface).
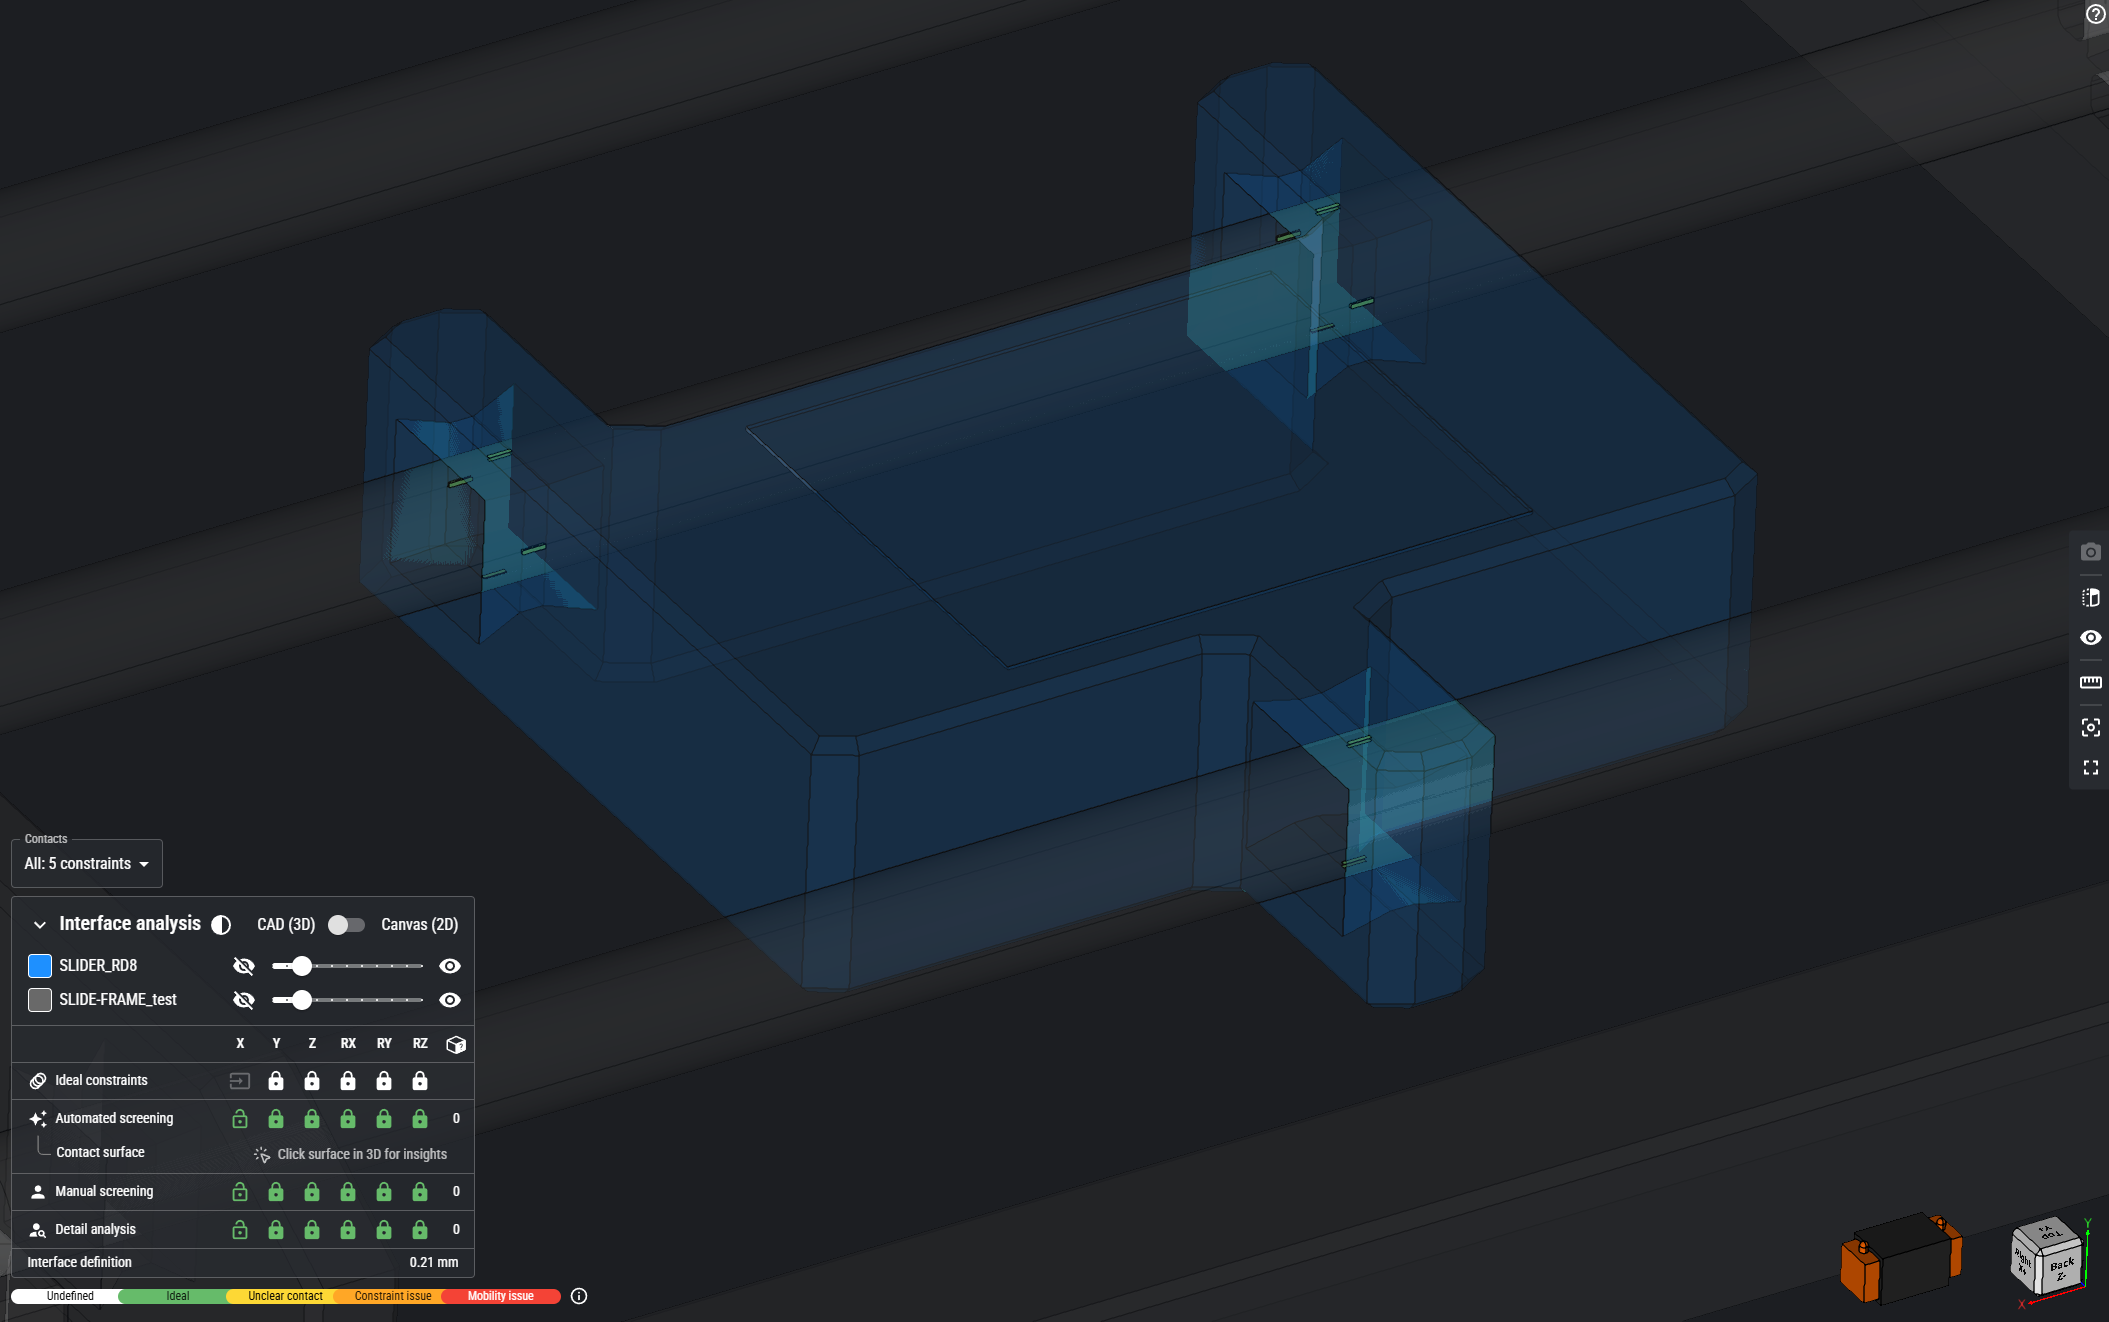
This results in that one of the "rail-fits" is actually not touching anymore. So it's acting like illustrated below:

Stop guessing - start engineering with tolerance clarity
Tolerances shape everything - from product quality to manufacturing cost. Yet in most teams, variation analysis is disconnected, slow, and often skipped. RD8 wants to change that. With automated tolerance chain analysis and data-driven risk detection, engineers can now pinpoint which dimensions really matter, reduce over-specification, and build more robust products - faster.
Avoid Instability. Eliminate Overconstraints
Beyond basic positioning, the true power of robust mechanical design lies in the mastery of constraints in interfaces. This principle dictates that for every degree of freedom a body possesses, a precise constraint must be applied to fully define its position and orientation in space. An under-constrained system is prone to unwanted movement and instability, while an overconstrained system can introduce internal stresses, assembly difficulties, and reduced performance.
RD8’s cutting-edge tools allow engineers to manage the 6 degrees of freedom (3 translational, 3 rotational) for each component, ensuring every interface and connection is intentionally defined. By guiding you through the application of the right number and type of constraints – from fixed and revolute joints to advanced planar and spherical constraints – we eliminate ambiguity, guarantee predictable behavior, and enable the creation of truly robust and reliable products.


Control constraints, Prevent Failures
In the complex world of mechanical product development, the success of any design whether static or dynamic relies on a profound understanding of kinematics and constraints to master the interfaces in your designs. It is not always about movement, it’s about predictable, reliable positioning of your parts within defined boundaries. This is where constraints become critical.
From assembly processes to complex mechanical movement, every part of a mechanical system interacts in a precise manner, governed by these constraints. The constraints decide the design of interfaces and can control, size, location, orientation and form.
Creating robust interfaces and controlling the interactions between parts, can lead to costly late-stage failures, unexpected behaviors, and significant delays in market entry. RD8 provides the robust tools necessary to precisely define, analyze, and optimize these fundamental aspects, ensuring your designs perform exactly as intended.
Master tolerances with RD8 software
Instead of relying on gut feeling or Excel-based stack-ups, RD8 gives your team a modern, visual, and collaborative piece of software to manage variation. Whether you're designing precision mechanisms or high-volume components, we help you brings clarity to complex assemblies - and avoid costly rework, ensure functionality, and speed up development cycles.

Set up a free RD8 Software Trial for your team
✓ Intial Set-up Call ✓ No Install ✓ ISO27001 Certified
Day 15: decide what's next.
Book an initial meeting to:
Bring your CAD file(s) or case(s). Otherwise RD8 can provide sample files.
By submitting, you accept RD8's Privacy Policy and Terms of Service.
